Published: Jan 7, 2026 by Dominik Berner
Security is no longer optional for embedded devices, especially not with the Cyber Resilience Act coming into effect. Unfortunately, adding secure boot to embedded Linux devices is often not straightforward. In this post, we share our experience implementing secure boot for an embedded Linux device based on the Raspberry Pi Compute Module 4 using the Yocto Project. (Warning, this is a long read!)
What is secure boot?
There are many aspects to consider when building a secure embedded device. One of the first steps towards security is making sure that a device runs only trusted software. This is generally called Secure boot and it is preventing attackers from loading malicious code on the device during the boot process. Secure boot is typically implemented using a chain of trust, where each stage of the boot process verifies the integrity and authenticity of the next stage before executing it.
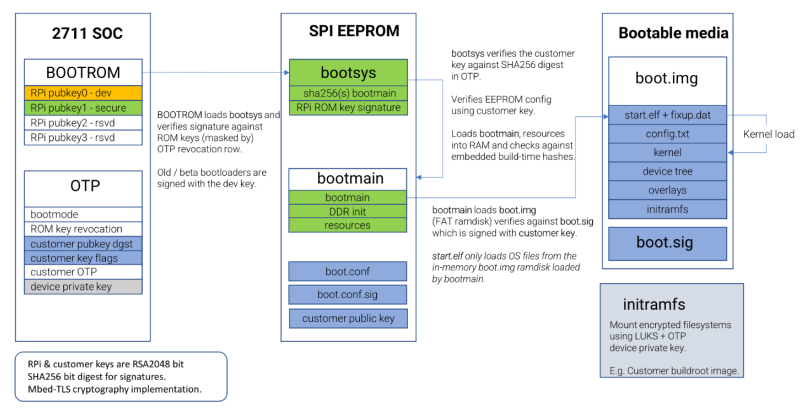
In practice, this means that the device’s bootloader is cryptographically signed, and the hardware verifies this signature before executing the bootloader. If the signature is invalid, the boot process is halted, preventing the execution of potentially malicious code. For a more in-depth documentation on secure boot for raspberry pi devices, check out the Raspberry Pi Secure Boot documentation.
Implementing secure boot with Yocto
On a high level, implementing secure boot for an embedded Linux device using Yocto involves the following steps:
- Enable trusted boot support on the device itself - In the case of the Raspberry Pi CM4, this involves configuring the EEPROM firmware to enable secure boot features.
- Provide the public key used for verifying the signature of the bootloader to the device and store it on the EEPROM.
- Create a
boot.imgcontainer that includes the bootloader, kernel, and device tree blobs (DTBs) - This container needs to be signed using a public key. - Configure Yocto to build and sign the
boot.img- This involves creating custom Yocto layers and recipes to handle the signing process and ensure that theboot.imgis correctly formatted. - Replace existing boot files with the signed
boot.imgand pack it into the boot partition of the device’s storage medium.
Before we dive into the details, we enable trusted boot on the Raspberry Pi CM4.
Enabling trusted boot on the Raspberry Pi CM4
Trusted boot on the Raspberry Pi CM4 needs to be enabled in the boot EEPROM by setting the SIGNED_BOOT flag in the boot.conf and by providing the public key to verify the signature. This is done using the rpiboot tool, which allows us to write the necessary configuration to the EEPROM. The usbboot repository provides the necessary tools and documentations to update the EEPROM for Raspberry Pi.
For illustration purposes, this article shows how to enable secure boot using a self-signed key pair. In a production environment, you would typically use a key pair issued by a trusted certificate authority (CA).
First, we generate a public/private key pair using OpenSSL:
openssl genrsa 2048 > keypair.pem
Next, we set up the boot.conf file to enable signed boot by setting SIGNED_BOOT=1. Then we use the update-pieeprom tool from rpiboot to update the EEPROM with the public key and flash it to the device:
update-pieeprom -k  keypair.pem
rpiboot -d /path/to/bootconf/
From this point on, the device will expect a signed boot.img during the boot process, the signature of it is expected to be present in a boot.sig file. If we try to boot an unsigned image, the device will halt the boot process with a Bad signature boot.sig error. To disable secure boot, we can overwrite the EEPROM again with SIGNED_BOOT=0.
Now that secure boot is enabled on the device, we can move on to configuring Yocto to build and sign the boot.img.
Configuring Yocto to build and sign the boot.img
Now that secure boot is enabled on the device and the key pair is generated, we can configure Yocto to build and sign the boot.img. This involves creating a custom Yocto recipe to create the boot container and to handle the signing process.
By default the raspberrypi layers in yocto store the boot files directly in the boot partition, so once we have a signed boot.img, we need to override the default behavior to use our signed image instead.
Let’s start with creating the boot.img container
Creating the boot.img container
The boot.img container is a fat16 formatted file that contains the bootloader, kernel, and device tree blobs (DTBs). We can create a custom Yocto recipe to build this container, let’s call this boot-img-container.bb:
The recipe will do the following things:
- Create a staging directory to hold the boot files
- Copy the bootloader, kernel, and DTBs to the staging directory
- Create a fat16 formatted
boot.img - Copy the boot files from the staging directory to the
boot.img
Let’s look at the recipe code:
inherit deploy nopackages

DEPENDS += "rpi-bootfiles rpi-cmdline rpi-config linux-raspberrypi dosfstools-native mtools-native"

# The raspberry pi bootloader files are located in the following directories
BOOTFILES_DIR = "${WORKDIR}/bootfiles"
DTBO_DIR = "${DEPLOY_DIR_IMAGE}"

S = "${WORKDIR}/boot-img-container"

do_compile() {
    # Create staging and target directory
    mkdir -p ${B}/boot-img-container-staging/overlays
    mkdir -p ${S}

    #collect all bootfiles from BOOTFILES_DIR and DTBO_DIR and and put it into the staging dir
    find ${BOOTFILES_DIR} -maxdepth 1 -type f ! -name 'cmdline.txt' -exec install -m 0644 -t ${B}/boot-img-container-staging/ {} +

    # copy all resolved .dtbo symlinks (the image is vfat formatted and symlinks are not supported)
    find ${DTBO_DIR} -type f -name '*.dtbo' -exec install -m 0644 -t ${B}/boot-img-container-staging/overlays {} +

    # copy all dtb files except overlay_map.dtb
    find ${DEPLOY_DIR_IMAGE} -type f -name '*.dtb' ! -name 'overlay_map.dtb' -exec install -m 0644 -t ${B}/boot-img-container-staging/ {} +

    # the overlay map file needs to be placed into the overlays folder too
    install -m 0644 ${DEPLOY_DIR_IMAGE}/overlay_map.dtb ${B}/boot-img-container-staging/overlays/overlay_map.dtb

    # copy the kernel image
    install -m 0644 ${DEPLOY_DIR_IMAGE}/${KERNEL_IMAGETYPE_DIRECT} ${B}/boot-img-container-staging/${SDIMG_KERNELIMAGE}

    BOOT_STAGING_DIR="${B}/boot-img-container-staging"
    BOOT_STAGING_SIZE_BYTES=$(find "$BOOT_STAGING_DIR" -type f -printf '%s\n' 2>/dev/null | awk '{s+=$1} END{print s+0}')

    # Create a FAT image sized to fit the staged files (+ padding), format it, copy files.
    BOOT_IMG="${S}/boot.img"

    # Add padding and round up to nearest MiB for filesystem overhead use awk because shell arithmetic is poorly supported in bitbake
    PADDING=$(awk 'BEGIN{printf "%d\n", 8*1024*1024}')
    PADDED_SIZE=$(awk -v a="$BOOT_STAGING_SIZE_BYTES" -v b="$PADDING" 'BEGIN{printf "%d\n", a+b}')
    MIN_SIZE=$(awk 'BEGIN{printf "%d\n", 1*1024*1024}')
    if [ "$PADDED_SIZE" -lt "$MIN_SIZE" ]; then
        PADDED_SIZE="$MIN_SIZE"
    fi
    PADDED_SIZE=$(awk -v n="$PADDED_SIZE" 'BEGIN{s=1024*1024; printf "%d\n", int((n + s - 1) / s) * s }')

    # Create an empty file of the desired size
    rm -f "$BOOT_IMG"
    truncate -s "$PADDED_SIZE" "$BOOT_IMG"

    # Create FAT16 filesystem
    mkfs.vfat -F 16 -n BOOT "$BOOT_IMG"

    # Copy files to the FAT image
    mcopy -i ${BOOT_IMG} -s ${BOOT_STAGING_DIR}/* ::/

}
do_compile[depends] += "rpi-bootfiles:do_deploy"
do_compile[depends] += "rpi-cmdline:do_deploy"
do_compile[depends] += "rpi-config:do_deploy"
# make do_compile depend on the boot files and kernel image
do_compile[filedeps] += " \
    ${BOOTFILES_DIR}/* \
    ${DEPLOY_DIR_IMAGE}/*.dtb \
    ${DEPLOY_DIR_IMAGE}/*.dtbo \
    ${DEPLOY_DIR_IMAGE}/overlay_map.dtb \
    ${DEPLOY_DIR_IMAGE}/${KERNEL_IMAGETYPE_DIRECT} \
First of all, we define the recipe as a deployment recipe by inheriting the deploy class. This allows us to place the generated boot.img in the deploy directory for later use. Since the recipe does not produce any packages to be put in the root filesystem, we also inherit the nopackages class. As for dependencies, we need the rpi-bootfiles and linux-raspberrypi recipes to provide the necessary boot files and kernel image. Additionally, we need dosfstools-native and mtools-native to create and manipulate the FAT filesystem.
Next we define the directories where the boot files are located. The BOOTFILES_DIR variable points to the directory where the Raspberry Pi bootloader files are located, while the DTBO_DIR variable points to the deploy directory where the DTBs are located.
And now begins the actual work. While we do not generate packages, we still compile an artifact, so we implement the do_compile function.
After creation of the staging and the target directory, we collect all necessary boot files from the defined directories and copy them to the staging directory. We make sure to copy the resolved .dtbo files instead of the symlinks, since the FAT filesystem does not support symlinks. These are all the find ... -exec install ... commands in the recipe. We also copy the kernel image to the staging directory.
Next comes the actual creation of the boot.img. We first calculate the size needed for the image by summing up the sizes of all files in the staging directory. We then add some padding and round up to the nearest MiB to account for filesystem overhead. This is a bit of an optimization to avoid wasting space, for a first implementation you could also just pick a fixed size that is large enough to hold all files. Since shell arithmetic is poorly supported in bitbake, I used awk for the calculations.
With the calculated size, we create an empty file of that size using truncate, format it as a FAT16 filesystem using mkfs.vfat, and finally copy all files from the staging directory to the boot.img using mcopy.
And with that, we have our boot.img container created!
Lastly, we make sure that the do_compile task depends on the deployment of the boot files and kernel image, so that it is executed after those are available. We also add the boot files and kernel image as file dependencies to ensure that any changes to these files will trigger a rebuild of the boot.img.
Next up is signing the boot.img.
Signing the boot.img
After creating the boot.img, we need to sign it using our private key. For debugging purposes, it is convenient to also be able to create unsigned images, so let’s add the signing as a separate recipe that depends on the boot-img-container recipe. This way we can choose whether to build a signed or unsigned image by including the appropriate recipe in our build.
Signing is relatively straightforward:
- Find the generated
boot.imgfrom theboot-img-containerrecipe - Generate a sha256 hash of the
boot.imgto create a digest - Sign the digest using the private key to create the signature
- Copy the
boot.sigfile to the deploy directory
The resulting recipe could look like this:
inherit nopackages

DEPENDS += "boot-img-container openssl-native xxd-native"

BOOT_IMG_PATH = "${DEPLOY_DIR_IMAGE}/boot.img"
SIG_FILE_PATH = "${DEPLOY_DIR_IMAGE}/boot.sig"
# Path to the .pem file containing the private key for signing
BOOT_IMG_CERTIFICATE_PEM = "${THISDIR}/files/development-1.key.pem"

do_compile() {
    if [ -z "${BOOT_IMG_CERTIFICATE_PEM}" ]; then
        bbfatal "BOOT_IMG_CERTIFICATE_PEM is not set. Please specify the path to the .pem file."
    fi

    if [ -f "${BOOT_IMG_PATH}" ]; then
        # Generate a signature file containing the sha256 hash of boot.img
        sha256sum "${BOOT_IMG_PATH}" | awk '{print $1}' > "${SIG_FILE_PATH}"
        # next is the time of signing
        printf 'ts: %s\n' "$(date -u +%s)" >> "${SIG_FILE_PATH}"

        # Generate RSA signature of the boot.img using openssl and hash it using sha256
        # append at the end of the sig file

        sig=$(openssl dgst -sha256 -sign "${BOOT_IMG_CERTIFICATE_PEM}" "${BOOT_IMG_PATH}" | xxd -c 4096 -p )
        printf 'rsa2048: %s\n' "${sig}" >> "${SIG_FILE_PATH}"
    else
        bbwarn "boot.img not found, skipping signature generation."
    fi
}

do_deploy() {
    if [ -f "${SIG_FILE_PATH}" ]; then
        install -D -m 0644 "${SIG_FILE_PATH}" "${D}${DEPLOYDIR}/boot.sig"
    else
        bbwarn "Signature file not found, skipping installation."
    fi
}

addtask do_compile after do_fetch before do_install
addtask do_deploy after do_compile before do_build
do_compile[depends] += "boot-img-container:do_deploy"
This recipe inherits the nopackages class since it does not produce any packages. It depends on the boot-img-container recipe to ensure that the boot.img is available for signing. Additionally, it depends on openssl-native and xxd-native to perform the signing operation.
The BOOT_IMG_PATH variable points to the location of the generated boot.img, while the SIG_FILE_PATH variable defines where the signature file will be created. The BOOT_IMG_CERTIFICATE_PEM variable should point to the private key file used for signing, this should be overridden with the actual path to the private key in a secure manner (i.e. by pulling it from an AWS Secrets Manager, Azure Key Vault, or similar secure storage).
The do_compile function first checks if the BOOT_IMG_CERTIFICATE_PEM variable is set and if the boot.img file exists. If both checks pass, it generates a SHA256 hash of the boot.img and writes it to the signature file. It also appends a timestamp to the signature file for reference. Then, it generates an RSA signature of the boot.img using the private key and appends it to the signature file.
And with that, we have our signed boot.img and boot.sig files ready for deployment! The do_deploy function installs the boot.sig file to the deploy directory, so the image creation command automatically packs it.
Lastly, we need to tell bitbake to execute the do_compile and do_deploy tasks at the appropriate times in the build process by adding them to the task graph. We do this by placing the do_compile task before the do_install task and the do_deploy task before the do_build task. We also make sure that the do_compile task depends on the deployment of the boot-img-container recipe to ensure that the boot.img is available for signing.
With that we have the recipes ready to create and sign the boot.img. The last step is to make sure that the signed image is used during the build process instead of the default boot files.
Using the signed boot.img in the build
Since the recipes are not packages, we add them to the machine part of the image configuration file (i.e. raspberrypi-cm4.conf):
IMAGE_BOOT_FILES = "boot.img config.txt boot.sig"
EXTRA_IMAGEDEPENDS += "boot-img-container sign-boot-img"
do_image_wic[depends] += "sign-boot-img:do_compile"
First the existing IMAGE_BOOT_FILES variable is overridden to include the boot.img and boot.sig files instead of the default boot files produced by the raspberrypi layer. Next, we add the boot-img-container and sign-boot-img recipes to the EXTRA_IMAGEDEPENDS variable to ensure that they are built before the image is created.
The recipes to create and sign the boot image need to be executed before the image creation process, so we add a dependency from the do_image_wic task to the do_compile task of the sign-boot-img recipe. If you are using a different image creation method (i.e. do_image_sdcard), you need to adjust this accordingly.
And with that, we have successfully integrated secure boot into our Yocto build process for the Raspberry Pi CM4. You can now build your image as usual using bitbake, and the resulting image will include the signed boot.img and boot.sig files, ensuring that only trusted software is executed during the boot process.
What about further improvements?
The recipes and approach described in this post provide a basic implementation of secure boot for an embedded Linux device using Yocto. For production use one improvement that needs to be made is to securely manage the private key used for signing the boot.img. Storing the private key directly in the source code or build environment is not secure and can lead to compromise of the key. Instead, consider using a secure key management solution, such as a hardware security module (HSM) or a cloud-based key management service (KMS), to store and manage the private key.
Share