Jekyll2025-08-12T06:51:44+00:00https://softwarecraft.ch//feed.xmlSoftwareCraftC++ Coder, Agilist, Rock Climber, Potatosalad ExpertThe 7 CMake anti-patterns that eat your time and energy2025-07-07T00:00:00+00:002025-07-07T00:00:00+00:00https://softwarecraft.ch//most-common-cmake-anti-patterns“CMake is hard and our builds are a nightmare!” If that sounds familiar, you’re not alone. CMake has a reputation for being painful to use - but most of that pain comes from bad practices, not the tool itself.In this post, I’ll break down 7 of the most common CMake anti-patterns I see in real projects. These issues often creep in from legacy setups or lack of modern CMake knowledge, and they tend to slow teams down, cause frustration, and make build systems nearly unmaintainable.
Let’s fix that.
1. Vendoring everything instead of using find_package
One of the worst time-wasters: bundling dependencies directly into your project (aka “vendoring”), either as source code or worse, as precompiled binaries.
It bloats your repo, makes updates a hassle, and creates fragile builds. Modern CMake projects should use find_package to locate and integrate dependencies cleanly. Many libraries now provide CMake config files out of the box. If they don’t, writing your own Find<Package>.cmake is a good step toward future-proofing.
CMake Best Practices: Discover proven techniques for creating and maintaining programming projects with
CMake. Learn how to use CMake to maximum efficiency with this compendium of best practices for a lot of
common tasks when building C++ software.
Even better, tools like Conan or vcpkg can take care of dependency management for you. Stop hardcoding paths - let CMake and your package manager handle it.
2. Not using CMakePresets
CMake Presets are a game-changer - use them! Since their introduction, they’ve made managing multiple build configurations so much easier. Instead of fiddling with command-line flags or custom scripts, you can define builds cleanly in CMakePresets.json.
CMake presets are one of the most impactful features introduced in CMake since the introduction of targets.
Presets reduce errors, improve consistency across teams, and help CI pipelines stay clean. By providing a standardized way to configure good build configurations for development, testing, and release builds, CMakePresets can significantly reduce the entry barrier for new contributors and help ensure that everyone is using the same build settings. Always include and maintain presets for your project, and encourage contributors to use them or create their own CMakeUserPresets.json files for their specific needs.
3. Still using global variables instead of targets
Modern CMake is all about targets - and has been for over a decade. Yet many projects still rely on global variables and configuration, making things messy and error-prone.
Targets make everything modular, scoped, and easier to maintain. Use commands like target_link_libraries, target_include_directories, and target_compile_options to apply settings only where needed.
And don’t just slap PUBLIC everywhere. Use PRIVATE by default, and only expose what’s absolutely necessary. You’ll reduce build times and avoid unnecessary rebuilds.
And if you still need global project settings, use options() with good descriptions and defaults, but keep them minimal. The goal is to avoid global state as much as possible.
4. Writing non-portable build instructions
It’s easy to hack together something that works on your machine and CMake’s possibility to call external commands and scripts is very powerful. But that doesn’t mean it’s portable. Using platform-specific paths, scripts, or flags ties your build to a single setup - and breaks everything elsewhere.
Stick to CMake’s built-in features:
Stick global compiler flags into CMake presets.
Use target_compile_options, target_compile_definitions, etc., instead of global flags.
Use cmake -P and cmake -E for scripting, not Bash or PowerShell.
Use CMake’s built-in function to find things like libraries and include directories - No hardcoded paths in CMakeLists.txt!
Set up toolchain files for cross-compilation.
Portability isn’t just for open-source projects. It’ll save you headaches even in single-platform codebases - especially when onboarding new devs or upgrading tools.
5. Half-baked library setup
Ever try using a library only to discover it’s missing version info, has broken exports, or forces a pile of transitive includes on you?
That’s what happens when the setup of the library target is incomplete or sloppy.
Don’t just make everything PUBLIC. Be precise with PRIVATE, PUBLIC, and INTERFACE. Set symbol visibility correctly, especially for shared libs. And always include version info (VERSION, SOVERSION) for libraries - it helps tools, consumers, and future-you.
You might think install rules don’t matter if you’re not publishing a library. But even in internal projects, a clean install() setup can make packaging, CI pipelines, or dev workflows way smoother.
It’s not hard: a few lines in your CMakeLists.txt go a long way. Think of it as a foundation for future packaging, or just making builds easier to deploy locally.
7. Neglecting maintenance of your CMakeLists.txt
CMake scripts aren’t “write-once” files. They need love too.
Old, bloated, or inconsistent CMakeLists.txt files are painful to work with and a nightmare for newcomers. Regularly refactor and clean up your build scripts - just like you do with code.
Update to modern CMake practices. Drop old workarounds. Add comments. Keep dependencies clean. You’ll thank yourself later.
How to fix it
If your team is grumbling about CMake, chances are you’re stuck in one - or several - of these anti-patterns. But you don’t have to fix everything overnight.
Which one hurts the most depends on the project and the team, but in general, the anti-patterns often go hand in hand. Modernize your CMake scripts and tackle one thing at the time and each step brings back a little bit of joy to the build process.
CMake Best Practices: Discover proven techniques for creating and maintaining programming projects with
CMake. Learn how to use CMake to maximum efficiency with this compendium of best practices for a lot of
common tasks when building C++ software.
Even if you can’t make things perfect, starting with small steps can lead quickly to improvements. Just applying PRIVATE and PUBLIC correctly can go a long way, replacing hardcoded paths with find_package and using CMake’s built-in functions to find libraries and include directories can make the build process more robust and portable. And usually with every step you take, you will find that the build process becomes easier to understand and maintain, leading to a more enjoyable development experience for everyone involved.
]]>Optimize your code for reduced cost of change2025-01-16T00:00:00+00:002025-01-16T00:00:00+00:00https://softwarecraft.ch//reduce-cost-of-change-in-your-codeSoftware development is an expensive business. Measured over the lifespan of a product, the cost of maintaining and changing the code over time often greatly outweighs the initial development cost. Successful software products nowadays often have lifespans measured in decades rather than years, and often they are kept under active development throughout the whole period. Evolving technology, fixing defects, adaptation to customer needs, or pressure from competition are common reasons why software needs change. In view of this, it is paramount that when designing software and writing code, you should optimize for reducing future cost of change first before anything else.
What drives the cost of change in software?
When talking about the cost of software products, companies often talk about total cost of ownership (TCO), which in simple terms means, “How much does it cost to keep the software running and up to date?” While the cost of operating software can be a significant cost factor contributing to the TCO, often the far larger cost factor is the amount of time software developers spend changing the code, improving or adding features, and fixing defects.
Changing and adapting software can be the major cost driver in software development, even before operational costs.
When maintaining software over time, there is always a base layer of effort needed just to keep the software running and up to date. These are things like changes in underlying hardware, operating systems, evolution of libraries, etc. This is what I refer to as the fixed cost of change. This kind of housekeeping is an important investment in keeping the cost of change low, but it is often hard to predict when this needs to be done. However, usually the far larger share of the cost is the controllable cost of change. This is driven by the number of feature requests, defects reported, volatility of the user base, and evolving user needs. These changes can often be planned based on observing the running system and feedback received. Thus, a development team can usually exert some control over these factors through deciding when, how, or if to implement a change, or by accepting certain limitations in functionality or stability instead of fixing a defect.
Looking at the typical software development process, any change made on an existing codebase usually involves the following steps:
Identifying the requirements of the change - Slicing requirements into small, incremental changes helps to decide whether the change is worth implementing or not.
Looking for the parts of the code that need to be changed - A modularized, consistently designed codebase makes finding the parts that need to be changed easier and reduces the impact of the change.
Changing the code and implementing the change - Good software craft and clean implementation reduce testing effort.
Testing and validating the changes - Good test coverage reduces the risk of regression.
Deploying the changes to the production environment - Frequent and easy deployment enables fast feedback and new requirements.
The circle of managing cost of change in software. (Click to enlarge, click again to reduce the size)
Each of these steps can be a source of cost, and each of them can be optimized to reduce the cost of change, which usually impacts the next step again. Generally, the faster a change can be implemented, tested, and deployed, the faster the loop can be closed and the faster value is generated. This includes also the waiting time between the steps. Nothing costs more than a finished change that is lying around for weeks or months before it is deployed and validated.
Controlling the fixed cost of change
One of the most frequent shortcomings regarding high cost of change that I see is not investing in the fixed cost of change frequently. Keeping your software reasonably up to date and doing so in frequent, but small increments is one of the major investments in keeping the cost of change small. A frequent mistake of software teams is not keeping the software stack current and up to date, especially once the speed of feature development slows down and once the software is considered mature. The effect is then that even if a small change is needed, the cost of change is high because the first thing a developer has to do is update the software stack to a version that is still supported and maintained. While this is not only a time-consuming factor, it is often a high risk to introduce hidden regression bugs into the software, leading to a much higher validation and testing cost than what would be needed just to test the new feature.
Keeping your software stack up to date is not glamorous work, but it is one of the most important investments in keeping the cost of change low.
When it comes to the controllable cost of change, there are a number of strategies that can be applied to reduce the cost of change in your code. Of the steps identifying the requirements, looking for the parts of the code that need to be changed, changing the code, testing the changes, validating the changes, and deploying the changes, all have potential for optimization. Here are some strategies that can be applied to reduce the cost of change in your code:
Identify requirements - Say “No” to a change
Let’s start at the very beginning with identifying requirements. The biggest cost saver here is saying “No” to a change. One of the twelve principles of the agile manifesto is “Simplicity–the art of maximizing the amount of work not done–is essential.” The equation is simple: the fewer features and code there are in a product, the less there is to maintain. To do so, a clear discussion about the value of the change is necessary. Ask “Do we (or one of our stakeholders) benefit if we do this?” If the answer is not a clear “yes,” then don’t do it. To help with this decision, rigorous slicing of stories into small, incrementally applicable changes is a must. This is done to reduce development effort while maximizing the value of the change. A frequent mistake here is that teams at this point are not talking about the value, but about the predicted cost only. A typical pattern I observe is that developers are asked to estimate the change, and if they give a low enough number, the change is applied.
A common mistake when deciding whether to fix a defect or add a feature is to talk about cost only instead of value first.
Another frequent omission at that stage is to not talk about what to remove from the product and talk about deprecation. If a product is running over decades, it is natural that some features at one point will become obsolete or too cumbersome to use and maintain. Having a clear strategy on how to remove or replace features from a product is as important as adding new ones. That usually involves a clear communication strategy to the users and stakeholders, a clear way to mark features as being phased out, and a clear plan on how to remove the feature from the codebase. Handling deprecation well can save a lot of cost in the long run. Removing bad or dead code reduces the noise developers have to dig through when looking for the parts of the code that need to be changed.
Finding the parts of the code that need to be changed
Once the decision is made to implement a change, the next step is to find the parts of the code that need to be changed. This is where good software design and architecture come into play. The more modularized and decoupled your code is, the easier it is to find the parts of the code that need to be changed. There is a high chance that after a few years of development, the people maintaining the code are no longer the same people who wrote the code. And even if they are, there is a high chance that a lot of detail just got forgotten. If the code is well structured and modularized, it is much easier for new developers to find their way around the codebase and to understand what needs to be changed. Build your software around a consistent architecture and design patterns, so it is easier to find the parts of the code that need to be changed. This can start at the smallest level, for instance, on how you use functions. Are you using non-const output parameters in functions, or are you strictly using structs as return values? Do you use exceptions or error codes to signal errors? You may like or not like some of these patterns, whatever you choose, be consistent.
Consistency in software design and architecture is more important than the actual choice of the pattern, to make locating the parts of the code that need to be changed easier.
Consistency extends all the way up to the architecture patterns like MVC, MVVM, Clean Architecture, or Hexagonal Architecture and whatever else is out there. Again, consistency is more important than the actual choice of the pattern, although choosing the completely wrong architecture can be a major cost driver. Whatever architecture you pick, favor strong modularization, low coupling, and high internal cohesion for your modules to reduce the cost of change.
Stick to your chosen design within a module, but decouple modules as much as possible. If your code is tightly coupled, you will have to change many other parts of the code when you change one part. This is a major cost driver in software development. The more code changed, the more likely you are to introduce bugs and the higher the testing effort will be. This, of course, has a backward effect on the decision of whether to implement the changed requirement or not. If you are sure that the change will be localized and not affect other parts of the code, it’s way easier to say “yes” to a change. Once you found the code, the fun part starts - changing the code and implementing the change.
Implementing the change
When implementing a change, having invested in good software practices upfront pays off a lot. But even if that was not done in the past, then start applying good practices with the change on hand. It might as well be that when the original code was written, there were no proper unit tests around, TDD was not practiced, and no code reviews were done. So what? Start doing that now! One of the most important things you can do at that stage is to further reduce the cost of change. I tend to say that every implementation should start with a refactoring first. Maybe the existing code is not following the current coding standards, has the wrong level of abstraction, or is not using any of the patterns you have chosen for that particular module. Don’t build on broken stilts; refactor the code first, so it is easier to understand and change.
Every implementation should strive to further reduce the cost of change (or at least not increase it significantly).
There is, of course, a trade-off on how much can be done. At one point, we might have to accept that some parts of the code are just too costly to repair and that we hit a flat spot on how much we can reduce the cost of change. The trade-off here is usually whether to sacrifice internal coherence of a module but improve decoupling and isolation of “bad code” more. On a whim, I usually try to isolate first rather than to keep coherence, but that is a personal preference and depends on a lot of factors.
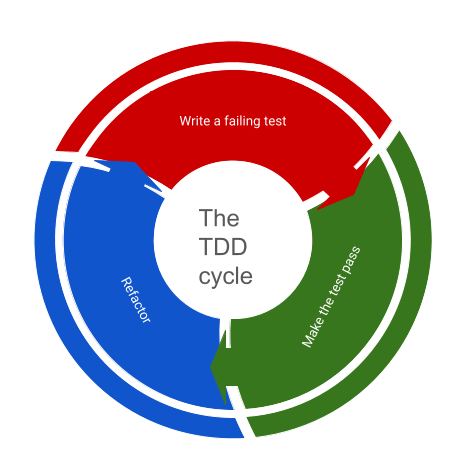
The TDD cycle of creating a failing test, making the test pass, refactoring, and starting again. (Click to enlarge, click again to reduce the size)
A very good practice to make sure the cost of change stays manageable when implementing new features is to use a TDD approach and relentlessly apply the full cycle, which includes refactoring of the original code. To skip the last step in the TDD cycle is a direct invitation to increase the cost of change. The other benefit of a TDD approach is that test coverage of new code stays high, which helps with verifying that the change is correct and that no regression bugs are introduced.
Testing and validating the changes
When thinking about the cost of a new feature, the testing and validation cost is often forgotten or underestimated. This often goes back to the segmentation of the system and how localized the change is. The splash radius of a change is often a very good indicator of how high the testing and validation cost will be. If the change is localized, the testing effort is usually low; the wider the effects, the more expensive testing goes. For instance, optimizing the performance of a single algorithm is usually a very localized change, and testing through a benchmark of before/after can be sufficient. Optimizing or changing a full workflow in the business logic could have a much wider effect and require a lot more testing, often involving manual testing - which is expensive.
While the verification of a feature - aka it works as defined - can often be automated, the validation - aka it works as expected - is often a manual process. The more manual the validation process is, usually the higher the contribution to the cost of change. It often pays off to think of what kind of validation is needed for a feature before actually implementing it. Sometimes validation of a change can only be done by the end user, so an easy way for (selectively) deploying changes to a subset of users can be a good strategy to reduce the cost of change.
Deploying the changes
So the change is now implemented and tested! Very good, now let’s ask the developers to roll it out to the production environment. This is where the cost of change can skyrocket. If the deployment process is manual, error-prone, and time-consuming, the cost of change is high even for the tiniest change. This can go up to the point where developers avoid even the tiniest fixes for fear of the cost of deployment.
Invest in an easy-to-operate and automated deployment process to reduce the cost of change and deploy changes one by one instead of bundled together into large releases.
The deployment process is often a neglected part of the software development process, but it is a very important part of the cost of change. If deployment to production is hard and involves jumping through seven hoops to get it done, a common pattern is that multiple changes are bundled together to reduce the cost of deployment. The problem here arises that at one point the feedback loop gets a lot longer and that big releases have a much higher chance to introduce hidden regression. Another pattern frequently observed is that if deployment is expensive, only big and heavy changes are even passing the decision threshold at the beginning of the cost-of-change cycle. Because, why spend days deploying a small change that might not even be needed? The result is software that might just do what it is supposed to do, but the many small kinks and annoyances that are never fixed make it a pain to use.
As long as a feature is not deployed, it only generates cost, but no value, so early deployment of any change will bring more value over time. This leads to one of the most destructive and behavioral patterns in software engineering. Only discussing software development from the cost perspective when evaluating whether to apply a change or not. While it might be true that software development is not cheap, holding back the work done and not letting it generate value is even more expensive. This closes the cycle of the cost of change because if features are never deployed, the cost of change for the next feature might be even higher.
Optimizing for reduced cost of change is a systemic problem
Being aware of the cycle that drives the cost of change is the first step to reduce it. The cost of change in software engineering is not just a technical problem, but a systemic problem that involves the whole team or even larger parts of an organization.
The circle of managing cost of change in software. (Click to enlarge, click again to reduce the size)
Optimizing the cycle can be a challenging task; however, if the cycle is observed, then one can usually spot the major bottlenecks quickly. Start where it hurts the most and where work piles up because it’s waiting for action. Whether it is improving the deployment infrastructure and processes, investing in test automation, improving the architecture or design of the software, or just training to say “No” to a change, there are many ways to reduce the cost of change in software.
]]>Using Conan as a CMake Dependency Provider2024-05-24T00:00:00+00:002024-05-24T00:00:00+00:00https://softwarecraft.ch//conan-as-cmake-dependency-providerManaging dependencies in CMake is hard. It’s a common pain point for C++ developers, especially when working on multi-platform projects or with complex dependencies. The introduction of dependency providers in CMake 3.24 aims to simplify this process by allowing package managers like Conan to provide dependency information directly to CMake. Conan and CMake are already a powerful combination for managing C++ dependencies, and this new feature further enhances their integration. In this post, we’ll explore how to use Conan as a CMake dependency provider, making dependency management in CMake projects more seamless and efficient. A sample project can be found on my github account
CMake Dependency Providers in a nutshell
Dependency providers are a new feature introduced in CMake 3.24 that allows package managers to provide dependency information directly to CMake. This information includes the location of the libraries, their include directories, and other necessary information for building the project. When a dependency provider is registered in CMake each call to find_package or FetchContent_MakeAvailable will trigger the corresponding function in the dependency provider script.
CMake Best Practices: Discover proven techniques for creating and maintaining programming projects with
CMake. Learn how to use CMake to maximum efficiency with this compendium of best practices for a lot of
common tasks when building C++ software.
Behind the curtains, a dependency provider is a CMake script that provides functions to locate dependencies through whatever means it can. In the case of Conan, this means calling calling conan install with the appropriate toolchain configuration and then extracting the necessary information from the files generated by Conan. To install a depenndency provider the script containing the provider definition is passed using the CMAKE_PROJECT_TOP_LEVEL_INCLUDES variable either from the command line or through a CMake preset
The official CMake documentation provides an in-depth explanation of how dependency providers work and how to create your own.
Setting up Conan as a CMake Dependency Provider
To set up Conan as a dependency provider we need three things:
CMake 3.24 or later
Conan 2.0.2 or later
The Conan CMake helper script to install it as a dependency provider
Installing CMake and Conan is straightforward and well-documented, so we won’t cover it here. The Conan CMake helper script is a CMake script that sets up Conan as a dependency provider in your project can be found in the cmake-conan repository. As of May 2024 the support is still experimental, but it should be stable enough for most use cases. To use the Conan CMake helper script, you can either download it manually or use it as a git submodule in your project. Since dependency providers have to be configured at the very beginning of the CMake configuration process, getting it over FetchContent or similar is not an option.
I usually end up with a directory structure like this:
The conan_provider.cmake script is the Conan CMake helper script that we will use to set up Conan as a dependency provider. The conanfile.txt file is the Conan configuration file that lists the dependencies of the project. The src directory contains the source code of the project and the CMakeLists.txt file contains the main CMake configuration.
Preparing the Conan and CMake configuration
Let’s assume we are building a simple project that depends on the fmt library for string formatting, which is available from the conan center repository. One of the nice things about dependency providers is that the CMakeLists.txt does not need any special configuration and can just use find_package and target_link_libraries as usual. The Conan CMake helper script will take care of the rest. The CMakeLists.txt file for the project looks like this:
Next, The conanfile.txt file lists the dependencies of the project:
[requires]
fmt/10.2.1

[generators]
CMakeDeps
Using the CMakeDeps generator in the conanfile.txt file tells Conan to generate the necessary information for CMake’s find_package function. This is necessary for the Conan CMake helper script to work correctly. There is also the CMakeToolchain generator that generates a toolchain file for CMake, but this is not recommended when using Conan as a dependency provider.
With that in place, we can now set up Conan as a dependency provider in the CMakeLists.txt file:
Using Conan as a CMake Dependency Provider
To set up Conan as a dependency provider, we need to pass the conan_provider.cmake script to CMake using the CMAKE_PROJECT_TOP_LEVEL_INCLUDES variable. This can be done either from the command line or through a CMake preset. The conan_provider.cmake script is the Conan CMake helper script that sets up Conan as a dependency provider.
Note that Conan requires the CMAKE_BUILD_TYPE to be set in order to download or build the correct version of the dependencies. The conan_provider.cmake script will take care of setting up the necessary Conan profiles and installing the dependencies in the local cache. The binaries and include files for the dependencies will be placed in the local Conan cache, which is usually located in the user’s home directory. Only the configuration files generated by Conan will be placed in the build directory. By default the Conan helper script is configured to use the default Conan profile and it tries to build any missing dependencies from source. These settings can be changed by setting the CONAN_BUILD_PROFILE and CONAN_INSTALL_ARGS variables respectively.
After running CMake, the project can be built as usual:
cmake --build build
And with that the project the project is set up to use Conan as a dependency provider.
I recommend to use CMake presets to make the configuration more reproducible and to avoid having to remember the command line arguments, especially when working with multiple configurations or platforms. For public projects I generally include the Conan helper script as a git submodule but depending on the project it might be easier to just download it manually.
Is it really that easy?
The introduction of CMakes dependency providers closes a long-existing gap in CMake’s dependency management and like CMake Presets I consider them a vast improvement regarding the tooling situation around C++ projects. So far I have only used Conan as a dependency provider but I am looking forward to seeing how other package managers will integrate with CMake. What I particularly like is that the CMake configuration can remain simple and platform agnostic while the complex dependency management is handled by Conan. This makes it easier to switch between different build systems or to integrate the project into a larger build system and in my opinion is a great incentive to use Conan for C++ projects.
]]>Preventive vs. Corrective Planning in Software Development: Striking the Balance2024-04-03T00:00:00+00:002024-04-03T00:00:00+00:00https://softwarecraft.ch//preventive-vs-corrective-planningIn software development, the way we do planning plays a crucial role in determining the success or failure of a project or product. It’s a dance between trying to foresee every possible scenario and being agile enough to navigate uncertainties as they pop up. On a high level, two primary approaches dominate this landscape: preventive planning and corrective planning. While classical project management methodologies often favor preventive planning, the agile movement has brought corrective planning to the forefront, emphasizing adaptability and responsiveness.
Preventive Planning: Building a Fortress against Uncertainty
Preventive planning operates on the principle of anticipating as much as possible. It aims to foresee and address potential issues, edge cases, and uncertainties before they materialize. In this approach, meticulous effort is invested upfront to cover all bases, in the hope to leave little room for surprises during the development process. Even with agile methodologies, safety-critical systems or projects with regulatory requirements might necessitate this thorough approach at least for some parts.
Preventive planning becomes a necessity in safety-critical systems.
Imagine building software for a medical device or an autonomous vehicle. Here, the stakes are high, and even the smallest oversight could have catastrophic consequences. Preventive planning becomes imperative in such domains to ensure that every possible scenario is considered and addressed preemptively.
On the other hand, preventive planning can also lead to analysis paralysis, where teams get bogged down in planning and lose sight of the bigger picture. The risk of over-engineering or building unnecessary features looms large when the focus is solely on preventing every conceivable issue upfront. This can lead to delays, increased costs, and a lack of adaptability when faced with changing requirements or market conditions. Additionally preventive planning is time consuming without tangible or sellable results, this bears a high risk that late but necessary changes might not be considered because of the sunk cost fallacy of the effort already invested.
Corrective Planning: Navigating Uncertainty
On the flip side, corrective planning thrives in environments characterized by uncertainty and rapid change. Instead of trying to predict and mitigate every potential issue upfront, corrective planning focuses on delivering value quickly and iteratively. It embraces the idea that it’s more efficient to course-correct as you go rather than attempting to chart the perfect path from the outset.
Agile methodologies exemplify corrective planning in action
This approach is particularly well-suited for software development, where requirements evolve, technologies advance, and market dynamics often shift quickly. Agile methodologies exemplify corrective planning in action, emphasizing flexibility, continuous feedback, and incremental delivery.
A danger of corrective planning is that it can lead to a lack of direction or focus, with teams constantly reacting to changes without a clear roadmap. This can result in scope creep and a lack of alignment between stakeholders. Another risk is that the team might not have the necessary expertise or resources to make the required course corrections effectively, especially if a fast pace is a key metric, leading to suboptimal outcomes or project failure.
Striking the Balance
While software development naturally leans towards corrective planning due to its dynamic nature, there are instances where preventive planning is indispensable. These often revolve around critical decisions that have far-reaching implications for the project’s success.
For example, selecting the appropriate technology stack or defining underlying architectural principles requires careful consideration and foresight. These decisions form the foundation upon which the entire system is built, and changing course midway can be costly and disruptive. In such cases, investing time and resources upfront to engage in preventive planning can pay dividends down the line.
Moreover, domain-specific requirements may demand a more cautious approach. Industries like healthcare, finance, and aerospace have stringent regulations and compliance standards that leave little room for error. Here, preventive planning becomes not just a preference but a necessity to ensure adherence to industry norms and mitigate risks effectively.
Expertise and trust are key to striking the right balance between preventive and corrective planning.
The difference between preventive and corrective planning isn’t a matter of choosing one over the other but rather finding the right balance between the two based on the project’s unique characteristics and constraints. Here are some strategies to strike this balance effectively:
Risk Assessment: Conduct a comprehensive risk assessment to identify critical areas where preventive planning is non-negotiable. Allocate resources and attention accordingly to mitigate these risks proactively.
Iterative Approach: Embrace an iterative development methodology that blends elements of both preventive and corrective planning. Start with a lightweight plan, validate assumptions through incremental delivery, and course-correct as needed based on feedback and evolving requirements.
Continuous Improvement: Foster a culture of continuous improvement where teams reflect on past experiences, learn from failures, and refine their planning approaches iteratively. Encourage open communication, knowledge sharing, and collaboration across teams to drive innovation and mitigate risks effectively.
Domain-specific Considerations: Consider the unique characteristics of the project domain, such as regulatory requirements, market dynamics, or technological constraints. Tailor the planning approach to align with these considerations while balancing the need for agility and reliability.
Build expertise and trust: Invest in building expertise within the team to make informed decisions and trust their judgment and ability for course corrections later. Empower team members to take ownership of their work, experiment with new ideas, learn from their experiences and lastly give them room and time to apply what they learned to the product to make the necessary course corrections.
In the complex landscape of software development, both preventive and corrective planning have their place. While the agile principles of adaptability and responsiveness advocate for corrective planning, certain situations call for the foresight and thoroughness inherent in preventive planning.
The key lies in striking the right balance between the two approaches, leveraging preventive planning where critical decisions or domain-specific requirements demand it, while embracing the agility and responsiveness of corrective planning to navigate uncertainties and deliver value iteratively. By understanding the nuances of each approach and applying them judiciously, software development teams can optimize their planning processes and increase the likelihood of project success in an ever-evolving landscape.
]]>CMake line by line - Creating a library2024-01-24T00:00:00+00:002024-01-24T00:00:00+00:00https://softwarecraft.ch//cmake-library-setupCreating a clean library that has proper symbol visibility and installation instructions might sound difficult. However with CMake it is relatively straight forward to set up, even if there are a few things to consider. Actually creating creating a library is as simple as invoking the add_library() command and adding the sources to it. When it comes to setting up the installation instructions and symbol visibility properly there is a bit more to it. There are also some small, but useful things like defining the version compatibility of the library that make the life of developers a lot easier if done properly.
In this post, we will go through the steps to create a library with CMake, including proper symbol visibility and installation. All the code for this post is available as a template on GitHub
Creating a library with CMake - A quick overview
When configuring for a library with CMake we need to do the following things:
Creating the library and adding the sources to it
Setting version compatibility
Specifying which include files are public and private
Setting symbol visibility and creating an export header
Defining where to install the library and make it usable with find_package()
Some miscellaneous things like setting the C++ standard and debug suffix
For detailed documentation on the commands used in this post, please refer to the CMake documentation.
CMake Best Practices: Discover proven techniques for creating and maintaining programming projects with
CMake. Learn how to use CMake to maximum efficiency with this compendium of best practices for a lot of
common tasks when building C++ software.
Choosing the right file structure for a project is always important as it makes it easier to find files and helps to keep the project organized. For libraries it is even more important, as others will want to use the library as well. Usually, not all files needed to build a library are necessary to use the library, so a clean separation helps to only install the files that are needed. For this post, we will create a library called “Greeter” or “libGreeter” and use the following file structure:
The library will expose a class Greeter::Hello that contains a greet() function that prints “Hello ${name} from a library” and it is declared in the include/hello/hello.hpp. Internally it uses a private function called print_impl which is defined in The internal.cpp and internal.hpp files. These are used to demonstrate how to hide symbols from the library interface. The GreeterConfig.cmake.in file is used to configure the CMake package file that will be used to make the library usable with find_package().
Let’s have a look at the public header file include/greeter/hello.hpp:
#pragma once
#include<greeter/export_greeter.hpp>
#include<string>namespaceGreeter{/// Example class that is explicitly exported into a libraryclassGREETER_EXPORTHello{public:Hello(conststd::string&name):name_{name}{}voidgreet()const;private:conststd::stringname_;};}// namespace Greeter
Two things are notable in this class, first, the including of the <greeter/export_header.hpp> file and second, the GREETER_EXPORT macro. The export_greeter.hpp file is generated by CMake and contains the necessary macros to export symbols from the library. The GREETER_EXPORT macro is used to mark the class as exported. This makes the class visible to users of the library and marks the class Greeter::Hello as part of the public API. The export header is generated by CMake and we will look at it later.
Creating the library with CMake
Let’s have a look at the CMakeLists.txt file line by line.
Click here to expand the full FindLibrary.cmake
cmake_minimum_required(VERSION 3.17)project(
Greeter
VERSION 1.0.0
DESCRIPTION
"A simple C++ project to demonstrate creating executables and libraries in CMake"
LANGUAGES CXX
)# set the postfix "d" for the resulting .so or .dll files when building the# library in debug modeset(CMAKE_DEBUG_POSTFIX
d
)# add the library target and an aliasadd_library(Greeter)add_library(Greeter::Greeter ALIAS Greeter)# set properties for the target. VERSION set the library version to the project# version * SOVERSION set the compatibility version for the library to the# major number of the versionset_target_properties(
Greeter
PROPERTIES VERSION ${PROJECT_VERSION}
SOVERSION ${PROJECT_VERSION_MAJOR})# add sources to the library targettarget_sources(
Greeter
PRIVATE src/hello.cpp src/internal.cpp
)# define the C++ standard needed to compile this library and make it visible to# dependerstarget_compile_features(
Greeter
PUBLIC cxx_std_17
)# set the include directoriestarget_include_directories(
Greeter
PRIVATE src
PUBLIC $<BUILD_INTERFACE:${CMAKE_CURRENT_SOURCE_DIR}/include>
$<INSTALL_INTERFACE:${CMAKE_INSTALL_INCLUDEDIR}>
)# if using limited visibility, set CXX_VISIBILILTY_PRESET to "hidden"include(GenerateExportHeader)set_property(
TARGET Greeter
PROPERTY CXX_VISIBILITY_PRESET "hidden")# Hide inlined functions by default, reducing the size of the libraryset_property(
TARGET Greeter
PROPERTY VISIBILITY_INLINES_HIDDEN TRUE
)# this command generates a header file in the CMAKE_CURRENT_BINARY_DIR which# sets the visibility attributes according to the compiler settingsgenerate_export_header(
Greeter
EXPORT_FILE_NAME
export/greeter/export_greeter.hpp
)# Add CMAKE_CURRENT_BINARY_DIR to the include path so the generated header can# be foundtarget_include_directories(
Greeter
PUBLIC $<BUILD_INTERFACE:${CMAKE_CURRENT_BINARY_DIR}/export>
$<INSTALL_INTERFACE:${CMAKE_INSTALL_INCLUDEDIR}>
)# include the GNUInstallDirs module to get the canonical install paths definedinclude(GNUInstallDirs)# Install the library and export the CMake targetsinstall(
TARGETS Greeter
EXPORT GreeterTargets
LIBRARY DESTINATION ${CMAKE_INSTALL_LIBDIR}
ARCHIVE DESTINATION ${CMAKE_INSTALL_LIBDIR}
RUNTIME DESTINATION ${CMAKE_INSTALL_BINDIR}
INCLUDES DESTINATION ${CMAKE_INSTALL_INCLUDEDIR})# install the public headersinstall(DIRECTORY include/ DESTINATION ${CMAKE_INSTALL_INCLUDEDIR})# install the generated export headerinstall(
FILES "${CMAKE_CURRENT_BINARY_DIR}/export/greeter/export_greeter.hpp"
DESTINATION ${CMAKE_INSTALL_INCLUDEDIR}/greeter
)# configure the CMake package file so the libray can be included with find_package() laterinclude(CMakePackageConfigHelpers)write_basic_package_version_file("GreeterConfigVersion.cmake"
VERSION ${PROJECT_VERSION}
COMPATIBILITY SameMajorVersion)configure_package_config_file("${CMAKE_CURRENT_LIST_DIR}/cmake/GreeterConfig.cmake.in""${CMAKE_CURRENT_BINARY_DIR}/GreeterConfig.cmake"
INSTALL_DESTINATION ${CMAKE_INSTALL_DATAROOTDIR}/cmake/greeter
)# install the CMake targetsinstall(
EXPORT GreeterTargets
FILE GreeterTargets.cmake
NAMESPACE Greeter::
DESTINATION ${CMAKE_INSTALL_DATAROOTDIR}/cmake/greeter
)
Setting up the library
As usual the CMakeLists.txt starts with cmake_minimum_required which specifies the minimum CMake version to be used and the project() call.
project(
    Greeter
    VERSION 1.0.0
    DESCRIPTION
        "A simple C++ project to demonstrate creating executables and libraries in CMake"
    LANGUAGES CXX
)
For libraries the VERSION field is important, as this is used to determine the version compatibility of the library. The LANGUAGES field is optional, but it is good practice to specify the language used in the project. This will make sure that the correct compiler is used when building the project.
The next thing to do is to set a debug postfix for the library with set(CMAKE_DEBUG_POSTFIX d). This means when building the library in debug mode, it will append a “d” to the resulting library file. This is useful to distinguish between debug and release builds of the library, but it is an optional step. This is a global option for the project, so it will affect all libraries and executables inside the project.
After that the library target is created with add_library(Greeter). This will create a library target called Greeter which can be used to add sources, set properties and link against other libraries. To make the library usable with find_package() the same way as if it was included with add_subdirectory or with FetchContent we also create an alias for the library with add_library(Greeter::Greeter ALIAS Greeter).
That way all targets that use the library can use Greeter::Greeter instead of just Greeter. This is useful to avoid name clashes and to make it clear that the target is a library.
Once the target is defined we can set the properties for the library.
set_target_properties(
Greeter
PROPERTIES VERSION ${PROJECT_VERSION}
SOVERSION ${PROJECT_VERSION_MAJOR})
The VERSION property sets the version of the library to the project version. The SOVERSION property sets the compatibility version of the library to the major version of the project. Generally you should try to use semantic versioning for libraries and set the SOVERSION to the major version of the library and determines API compatibility. Generally I advise to use the following rules for versioning:
If your change the public API by removing or changing an interface class or function, increase the major version
If new symbols are added to the API but nothing is changed or remove increase the minor version
For implementation changes that do not affect the API increase the patch version
Once the target is created and the properties are set, we can add the sources to the library target with target_sources(). This command takes the target name and a list of source files and adds them to the target. The sources are added as private sources, which means they are only visible to the target itself. This is important to hide implementation details from the library interface.
Next we need to set up the include directories for the library. For the public include directories, there are two things to consider here, first the headers need to be available to the library itself and second, the headers need to be available to users of the library. This makes the target_include_directories() command a bit more complicated.
target_include_directories(
    Greeter
    PRIVATE src
    PUBLIC $<BUILD_INTERFACE:${CMAKE_CURRENT_SOURCE_DIR}/include>
    $<INSTALL_INTERFACE:${CMAKE_INSTALL_INCLUDEDIR}>
)
This command takes the target name and a list of include directories. The PRIVATE keyword means that the include directory is only visible to the target itself. We add the src folder here which contains all the internal headers/
The PUBLIC keyword means that the include directory is visible to the target and to users of the library, to differ the include path during building the library and when it is installed, a generator expression is used. If we’re building the library itself the $<BUILD_INTERFACE:${CMAKE_CURRENT_SOURCE_DIR}/include> expression will be evaluated to the include folder in the source directory. If the library is installed, the expression $<INSTALL_INTERFACE:${CMAKE_INSTALL_INCLUDEDIR}> will be evaluated to the install include directory. This makes sure that the correct include directory is used when building the library and when it is installed.
Setting symbol visibility
Separating the headers into private and public is one step to define the library interface, we can go a step further by defining the symbol visibility of the library. This is important to hide implementation details from the library interface and to reduce the size of the library. First the default visibility of the library is set to hidden:
This means that all symbols are hidden by default and need to be explicitly exported. On Windows this is already the default, on linux und mac the default is that everything is visible. Additionally we can hide inlined functions by default, which will reduce the size of the library some more but it also means that inlined functions need to be explicitly exported.
CMake has a built-in module called GenerateExportHeader that can be used to generate a header file that sets the symbol visibility according to the compiler settings, which is included with include(GenerateExportHeader). This gives us the generate_export_header() command which generates the export macro header file for a target.
By default the export header will be created in the ${CMAKE_CURRENT_BINARY_DIR} directory unless an absolute path is passed to EXPORT_FILE_NAME, in this case exporting to the default location is fine, but we define the folder structure and the file name to be export/greeter/export_greeter.hpp. Putting the export file into its own subfolder helps later with finding and installing it. The generated header file contains the necessary macros to export symbols from the library.
In order to use the included file with #include <greeter/export_greeter.hpp> we need to add the ${CMAKE_CURRENT_BINARY_DIR} to the include path. This is done with the target_include_directories() command again. Again we use the generator expression to differ between building the library and installing it.
target_include_directories(
    Greeter
    PUBLIC $<BUILD_INTERFACE:${CMAKE_CURRENT_BINARY_DIR}/export>
    $<INSTALL_INTERFACE:${CMAKE_INSTALL_INCLUDEDIR}>

)
This concludes the setup of the library target and it can be built and used in other projects by using add_subdirectory() and target_link_libraries(). However for a library to be useful it needs to be installed and usable with find_package().
Defining installation behavior
To make the library usable with find_package() we need to install the library and create a CMake package file. The first step is to define where the library should be installed. This is done with the install() command. The CMake module GNUInstallDirs defines the canonical install paths for different platforms which should be used except for special cases.
The first thing to set is the install destination for the library itself. This is done with the LIBRARY, ARCHIVE and RUNTIME keywords. The LIBRARY keyword is used for shared libraries, the ARCHIVE keyword is used for static libraries and the RUNTIME keyword is used for executables. The INCLUDES keyword is used to install the include directories.
This tells CMake to install the target Greeter the the paths specified below. the EXPORT GreeterTargets keyword tells CMake to export the target information to an export set called GreeterTargets which will be used later to create the CMake package file in order to make the installation usable with find_package.
The CMAKE_INSTALL_LIBDIR, CMAKE_INSTALL_BINDIR and CMAKE_INSTALL_INCLUDEDIR variables are defined by the GNUInstallDirs module.
The public headers and the export-header need to be installed explicitly in a similar manner:
For normal usage in a system as runtime library this would be already enough, but since this is a CMake package we want this to be usable as easily as possible by other devs. This means we need to create a CMake package file that can be used with find_package().
Making the library usable with find_package()
CMake provides the CMakePackageConfigHelpers module which - as the name suggests - contains helper functions that can be used to create a CMake package file. A CMake package consists of a version information file, a configuration file and a list of exported targets. The version information file is used to check if the correct version of the package is installed and the package file is used to make the package usable with find_package().
The first step is to create the version information file with write_basic_package_version_file().
write_basic_package_version_file("GreeterConfigVersion.cmake"
VERSION ${PROJECT_VERSION}
COMPATIBILITY SameMajorVersion)
This command takes the name of the file to be created, the version of the package and the compatibility mode. The compatibility mode is used to determine if the package is compatible with the requested version. In this case we use SameMajorVersion which means that the package is compatible if the major version is the same.
Next we generate the package file from a template:
internally calls configure_file() to generate the package file from the template. The generated file will be called GreeterConfig.cmake and will be installed to ${CMAKE_INSTALL_DATAROOTDIR}/cmake/greeter. The template file is a generic file that looks like this:
The @PACKAGE_INIT@ macro is replaced by the CMakePackageConfigHelpers module with the necessary code to initialize the package. The @PROJECT_NAME@ macro is replaced with the project name. It includes the file containing the targets and checks if the required components are available.
This takes the export set GreeterTargets which we created above with the install(EXPORT) command and installs it to ${CMAKE_INSTALL_DATAROOTDIR}/cmake/greeter. Then the namespace Greeter:: is added to the targets in the export set. This means that the targets can be used with Greeter::Greeter instead of just Greeter.
With this the library is ready to be, built installed and used with find_package(). To build and install the library call.
By default this will create a static library, to create a shared library add -DBUILD_SHARED_LIBS=ON to the cmake command to configure the project.
The setup described here is the bare minimum to create a clean library with CMake. There are a few more things that can be done to make the library more usable and portable, like adding packaging information and of course it pays to set up proper testing as well.
]]>LLMs and AI make software development harder2023-11-03T00:00:00+00:002023-11-03T00:00:00+00:00https://softwarecraft.ch//ai-tools-make-our-job-harderLLMs and AI make software development harder. Wait, what? Isn’t the whole point of AI to make writing code easier? Well, yes. But writing code is the easy part of software development. The hard part is understanding the problem, designing business logic and debugging tough bugs. And that’s where AI code assistants like copilot or chatgpt make our job harder, as they strip a way the easy parts of our job and only leave us with the hard parts and make it harder for new developers to master the craft of software development.
Coding is the easy part?
Is coding really that easy? No, not exactly easy - mastering a programming language still takes years of practice. But when looking at software development as a whole, writing code is one of the easier part and it is no wonder that chatgpt and copilot can write decent code. First, they have trained on millions of lines of code and second, code is by its nature very easy to understand for a machine as programming languages are very structured languages with limited vocabularies. For a LLM it is probably much easier to learn than natural language.
Programming languages are just very powerful tools that we use to solve problems
In the end, programming languages are just very powerful tools that we use to solve problems. And the hard part is not the learning tool, but understanding the problem and designing a solution for it. This is instantly obvious as most software engineering problems could be solved by a lot of different programming languages, which one to pick is a matter of context or even personal preference.
Another indicator that programming is that easy part is, that the more senior a software developer gets, the less time they usually spend writing code. Instead seniors spend more time understanding the problem, designing the solution, jumping in to debug tough bugs or doing design decisions and of course mentoring junior team members. While this might not be true for every senior developer, when looking at my software development bubble this is a clear trend.
The hard parts of software development
Copilot and other AI assistants are a great help for developers, but they are not flawless. A part of it is natural, as they are trained on existing code without any context and there are also some bad habits from the training data that code assistants might have picked up. And while this might get optimized over time, at the moment it means that developers still have to review the code that is generated by the AI code assistants. And reviews are hard - especially if one cannot query the author of the code for their intent.
And even if the code is good enough, it might still introduce flaws into the control logic of a program, might be missing edge cases or introduce a regression bug when integrated into an existing code base. This means that developers have to debug the code that is generated by the AI code assistants in case of an error. And debugging is hard - especially for these kind of problems where it might be hard to recreate the circumstances that cause the bug in the first place.
As the generated code heavily depends on the context we give the AI code assistants, this means that we have to be very precise in our descriptions which means that we have to understand the problem very well, which requires domain knowledge and context awareness on the side of the developer. Even if we just focus on the technical part, being aware of the surrounding architecture and the existing code is crucial to get good results.
Granted we could ask LLMs like chatgpt for help with integration into the codebase or we could just pass it the whole codebase and let it redesign everything. But apart from requiring lot of input to give enough context debugging in an unfamiliar codebase is even tougher than debugging stuff that you wrote yourself.
And then there is the whole thing about figuring out what exactly our product should do, how it should behave and how it should look like. At the moment this still requires a lot of human smarts and while AI tools might allow us to iterate faster on figuring out what we want to build in the end it is still a human that has to make the decision.
AI generated software development is exhausting
It seems a given that AI assistants will change our job by automating away writing code and even helping us with some design decisions. It is very convenient that we can ask chatgpt questions regarding system design and get reasonable answers. What is still left to us is making the decision on which answer to pick and which prompt to give to the LLM to get the results that we need. And this is very exhausting - decision fatigue is a thing and it is very real. Already before AI code assistants the limiting factor in the speed of delivering software was not the often the decision making process of an organization or a team - not writing the code.
The limiting factor in delivery speed is decision making, not writing code
On top of that is that current company structures will most likely still hold software developers accountable for the code that is running in a product, not the AI code assistants that wrote them in the first place. This will add another layer of stress on it, not just do we need to make more decisions faster, we are also to blame if the AI code assistants make a mistake.
And if there is a mistake then the debugging needs to be done, which often needs a lot of context and background knowledge to be efficient. AI tools are of less help there, because they cannot figure out context changes by themselves. They might help us with the easy part of debugging like running tests with different variations, to narrow down the cause but finding the prompt for an LLM to generate the fix will still be on us.
Are AI tools replacing developers?
AI assistants might lower the initial hurdle to get into software development, but they will not make it easier to become a good, experienced software developer. Most of the senior developers I know gained the background knowledge and context needed to formulate complex solutions from years of slogging through (bad) code and learning from their mistakes. This might be an inefficient way of learning but it is very effective in building up the domain knowledge that is needed for software development.
This knowledge is also something that is very hard to teach in a formal way, as books or online tutorials by nature are somewhat generic and and adaption to real life situations still needs hands-on experience.
As I see it, broad usage of AI tools will change the the skill distribution of software developers. We might end up with a lot more junior developers that are able to write code - or at least prompt the LLMs write the code - but lack the deep understanding of software development to be efficient in decision making. On the other hands senior developers that have acquired the context and domain knowledge will be fewer and fewer as the effort to acquire this knowledge will be higher as AI tools will hide away the parts that would enable us to learn unless the generated code is reviewed in-depth, which then raises the question if we gain that much efficiency through the tools at all.
So are AI tools replacing developers? Currently no, they will transform the job of a developer but they will not replace them. The question is how we as an industry will make sure that we retain the knowledge and experience that we have gained over the years. It will also raise the question how we handle the human side of software development, as the job will either become more boring because we just feed machines with prompts, yet more stressful because we have to make more hard decisions faster. Or maybe AI tools are really just a hype and a fad and nothing will change at all.
]]>The four core powers for empowered agile teams2023-07-14T00:00:00+00:002023-07-14T00:00:00+00:00https://softwarecraft.ch//what-are-agile-empowered-teamsEmpowering Teams is a key aspect to create high-performing teams in an agile setting. Ever since Extreme Programming was introduced into the world of software development this statement or a variety of it has been carried over to almost all agile frameworks. And there is a multitude of articles about how to create them. But what does “empowered” exactly mean? What are the minimum powers that a team needs to be able to be agile?
As with a lot of things in agile, the bandwidth of how far one wants to go with empowering the team depends heavily on the context and the organization a team lives in. This can range from choosing their agile framework to budget allocations up to teams doing their hiring. However, if we focus on the process perspective of delivering quality software effectively, there are surprisingly few things that a team needs to be able to do to significantly change the game of agile software delivery.
Empowerment and Performance
If we define performance as “the ability of a team to constantly deliver value to the customer in a timely fashion” then we can derive the minimum empowerment that a team needs to be able to do this.
Performance is “the ability of a team to constantly deliver value to the customer in a timely fashion”
From this definition, we can deduct the minimum of core powers that a team needs to be able to be performant:
Being able to prioritize their backlog and have the final word on what is in it - this includes the ability to say no to backlog items and delete them
Being able to allocate capacity and work
Setting the pace for releases and deciding when to release what
Shaping their development and testing infrastructure to their needs without organizational hurdles
In short, this can be summarized as “The team can decide what to do, who does it when, and how”. It is almost impossible for one empowerment to work out without the others being there, but if one has to start building up the empowerment starting with the ability to prioritize and maintain their lean backlog is often a good first power to gain. If it is clear to the team what to do next, then the team can decide “how much” of the backlog it can or wants to deliver in a given amount of time, which boils down to capacity allocation within the team.
The team usually has a good overview of what non-backlog-related tasks are on their plate - such as maintaining infrastructure, taking care of individual education, or fixing things discovered in a retro. All this has to be taken into account and who can do this better than the team itself? The power to allocate capacity for working on the backlog directly translates to the ability to set the pace for releases. I still stand on the point that releasing often and in small increments is superior to rare big-bang releases, quality assurance and releasing need to be highly automated tasks that need little to no human interaction. This directly leads to the team’s need to be able to shape their infrastructure after their fashion. This includes the ability to decide what tools to use and how to use them. In reality, there are often some organizational constraints to this, but again the fewer the better. Let’s look at each of these powers in more detail and how they work together.
The power of prioritizing the backlog
The backlog is the central artifact in agile software development and as such it is a prioritized list of problems to be solved. Some of them might not yet be fully understood and for most of them, there might exist several solutions.
The backlog is a list of problems to be solved - not a list of task to be done
Software development is a flow-based activity, which needs focus to be done effectively and efficiently and as the team knows best how to get into the flow, they need the power to say what they want to work on next and to assign a unique priority to the backlog items. While the team should have the final say on what goes to the top of the backlog, they need to be acutely aware of their customer’s needs, and the team must respect and manage stakeholder expectations about what is important for who. As such teams need to be keenly aware of the different stakeholder groups regarding their product and understand their needs and expectations and they need the clout so stakeholders accept it if the teams say “No - We’re not doing this (yet)”.
Long term a team should strive to have some kind of fairness regarding the prioritization of the needs of each stakeholder group - including the team’s own needs. By determining what part of the backlog the team should do next, they can align that with their capacity to do work.
The power of allocating capacity and work
Once the priority of problems to solve is established, the team should be able to determine how much of the backlog they want to tackle at the same time. This is independent of the agile framework chosen, be it kanban where the team sets their work-in-progress limits, or scrum where the single sprints give a limited timeframe to tackle problems. Part of being able to allocate work is slicing backlog items to a workable size and breaking down the problems into smaller chunks that can be solved iteratively and incrementally. This is a skill that can easily be learned on the job and most teams master it relatively quickly. The number of problems solved and time invested has a direct relation to when solutions can be released to the customer and since the teams decide what to do with which capacity they naturally are in charge of setting the pace for their releases. On the other hand empowered teams often also have some tasks that are inward facing such as maintaining their infrastructure, fixing bugs, mentoring each other, or learning new things. These tasks also need to be taken into account when allocating capacity and the team is in the best position to do so.
The power of setting the pace for releases
Grass doesn’t grow faster if you pull on it - and software is not delivered faster by setting arbitrary deadlines. Sure, there might be outside constraints that determine good time windows for releasing to the public, but generally, these windows are not as business-critical as we are often made to believe. Overall it is a much better strategy for teams to set the pace for releasing. This works especially well if the team manages to release often and in small increments. Ideally, features are pushed to the customers whenever they are ready instead of artificially waiting for a specific date because this increases the speed of the feedback loop. As the team is responsible for allocating time and ensuring the quality of their work, naturally, the team should be in charge of saying when they see a product increment fit for release to the public.
Grass doesn’t grow faster if you pull on it - and software is not delivered faster by setting arbitrary deadlines.
To release frequently, releasing should be a painless process and ideally, there should be mechanisms in place to easily roll back released versions, such as staged releases or feature toggles or staged releases. While the team usually can tell if a feature is of a good enough technical quality, determining whether a feature is ready to be used often requires feedback from the stakeholders and oftentimes, the only way to get this is by releasing the feature to production. The other side of the coin of giving the power to release to the team is that the team has to ensure the quality of the software to be confident that a release will work as expected. This is where the power of shaping the development and testing infrastructure comes into play.
The power of shaping the development and testing infrastructure
As the teams are expected to take over responsibility for the quality of their software and the release pipeline, they need the power to shape and extend their development and testing infrastructure to their means. This includes the ability to decide what tools to use. It is not uncommon that companies restrict the freedom of choice for tools and services, but it generally pays to have as few restrictions regarding what tool and technology to use as possible. With modern approaches like GitHub actions or Azure DevOps pipelines and similar spinning up a new build and test environment is a matter of minutes and the team should be able to do this on their own, without jumping through bureaucratic hoops to get their work done.
The other side of this empowerment means that the teams have to have the skill for building and maintaining their build and test environments. Granted this can take quite some time and effort to master, but once a team has mastered this skill, adding new quality tools or upgrading existing ones to fit a new need is a matter of hours and not days or weeks, and this is often a huge performance boost.
It is also crucial that are not just focussing on the continuous integration (CI) aspect of their build and testing infrastructure, but that they also invest in the continuous deployment (CD) part, which creates and delivers the software to the customer. As the empowered team has the power to decide when to release what, they also have to be able to do it “on a whim”. By deciding what to release when and having the skill to do so an agile team can greatly reduce the feedback loop and thus increase the speed of delivery, making them truly agile.
Conclusion
The main goal of giving the team the power to prioritize the backlog, allocate capacity and work, set the pace for releases, and shape the development and testing infrastructure is to enable the team to make them fast at generating and reacting to customer feedback. If a team can do these four things more autonomously they gain a lot of flexibility in how they work and how they deliver value to the customer, which is a basis for high-performing teams that want to do agile software development.
There are more aspects of empowering teams to reach peak performance, like being involved in the hiring, shaping overall team composition, and managing the personal growth of their members, but if one wants to start somewhere starting with backlog prioritization, capacity allocation, release planning and shaping the development and testing infrastructure are a good choice to have first.
]]>Testing strategies for software that interacts with hardware2023-05-03T00:00:00+00:002023-05-03T00:00:00+00:00https://softwarecraft.ch//software-testing-when-hardware-is-involved“Testing our software is difficult, because of the hardware involved”, is a common sentence when developing software for a specific hardware platform. Testing software that interacts closely with hardware indeed complicates the testing setup and in turn, often means that additional cost and effort are required. As the range of “embedded software” goes from low-level firmware running on a specific chip to software running on a specifically designed operating system with custom peripherals there is no one-size-fits-all solution to this. However, there are some strategies and principles that can help to make testing when easier and more effective.
The obvious goal of testing is to ensure that the software and hardware work as expected and to catch regression bugs as early as possible. With hardware involved catching regression often becomes quite important as the specific environment that the software is running on might evolve and introduce new bugs. The trivial approach is to “just run your code on the hardware”, but depending on the setup, this might not always work. The hardware might be too expensive to have available in large quantities or the setup might be too complicated to reproduce and maintain at scale - Not to mention that having lots of hardware around might also be quite expensive. So a good testing strategy is usually a tradeoff between fast feedback and running tests in an environment that is close to the production environment. If I have to choose, I generally put slightly more emphasis on quick and timely feedback to the developers than on creating a perfect testing environment.
CMake Best Practices: Discover proven techniques for creating and maintaining programming projects with
CMake. Learn how to use CMake to maximum efficiency with this compendium of best practices for a lot of
common tasks when building C++ software.
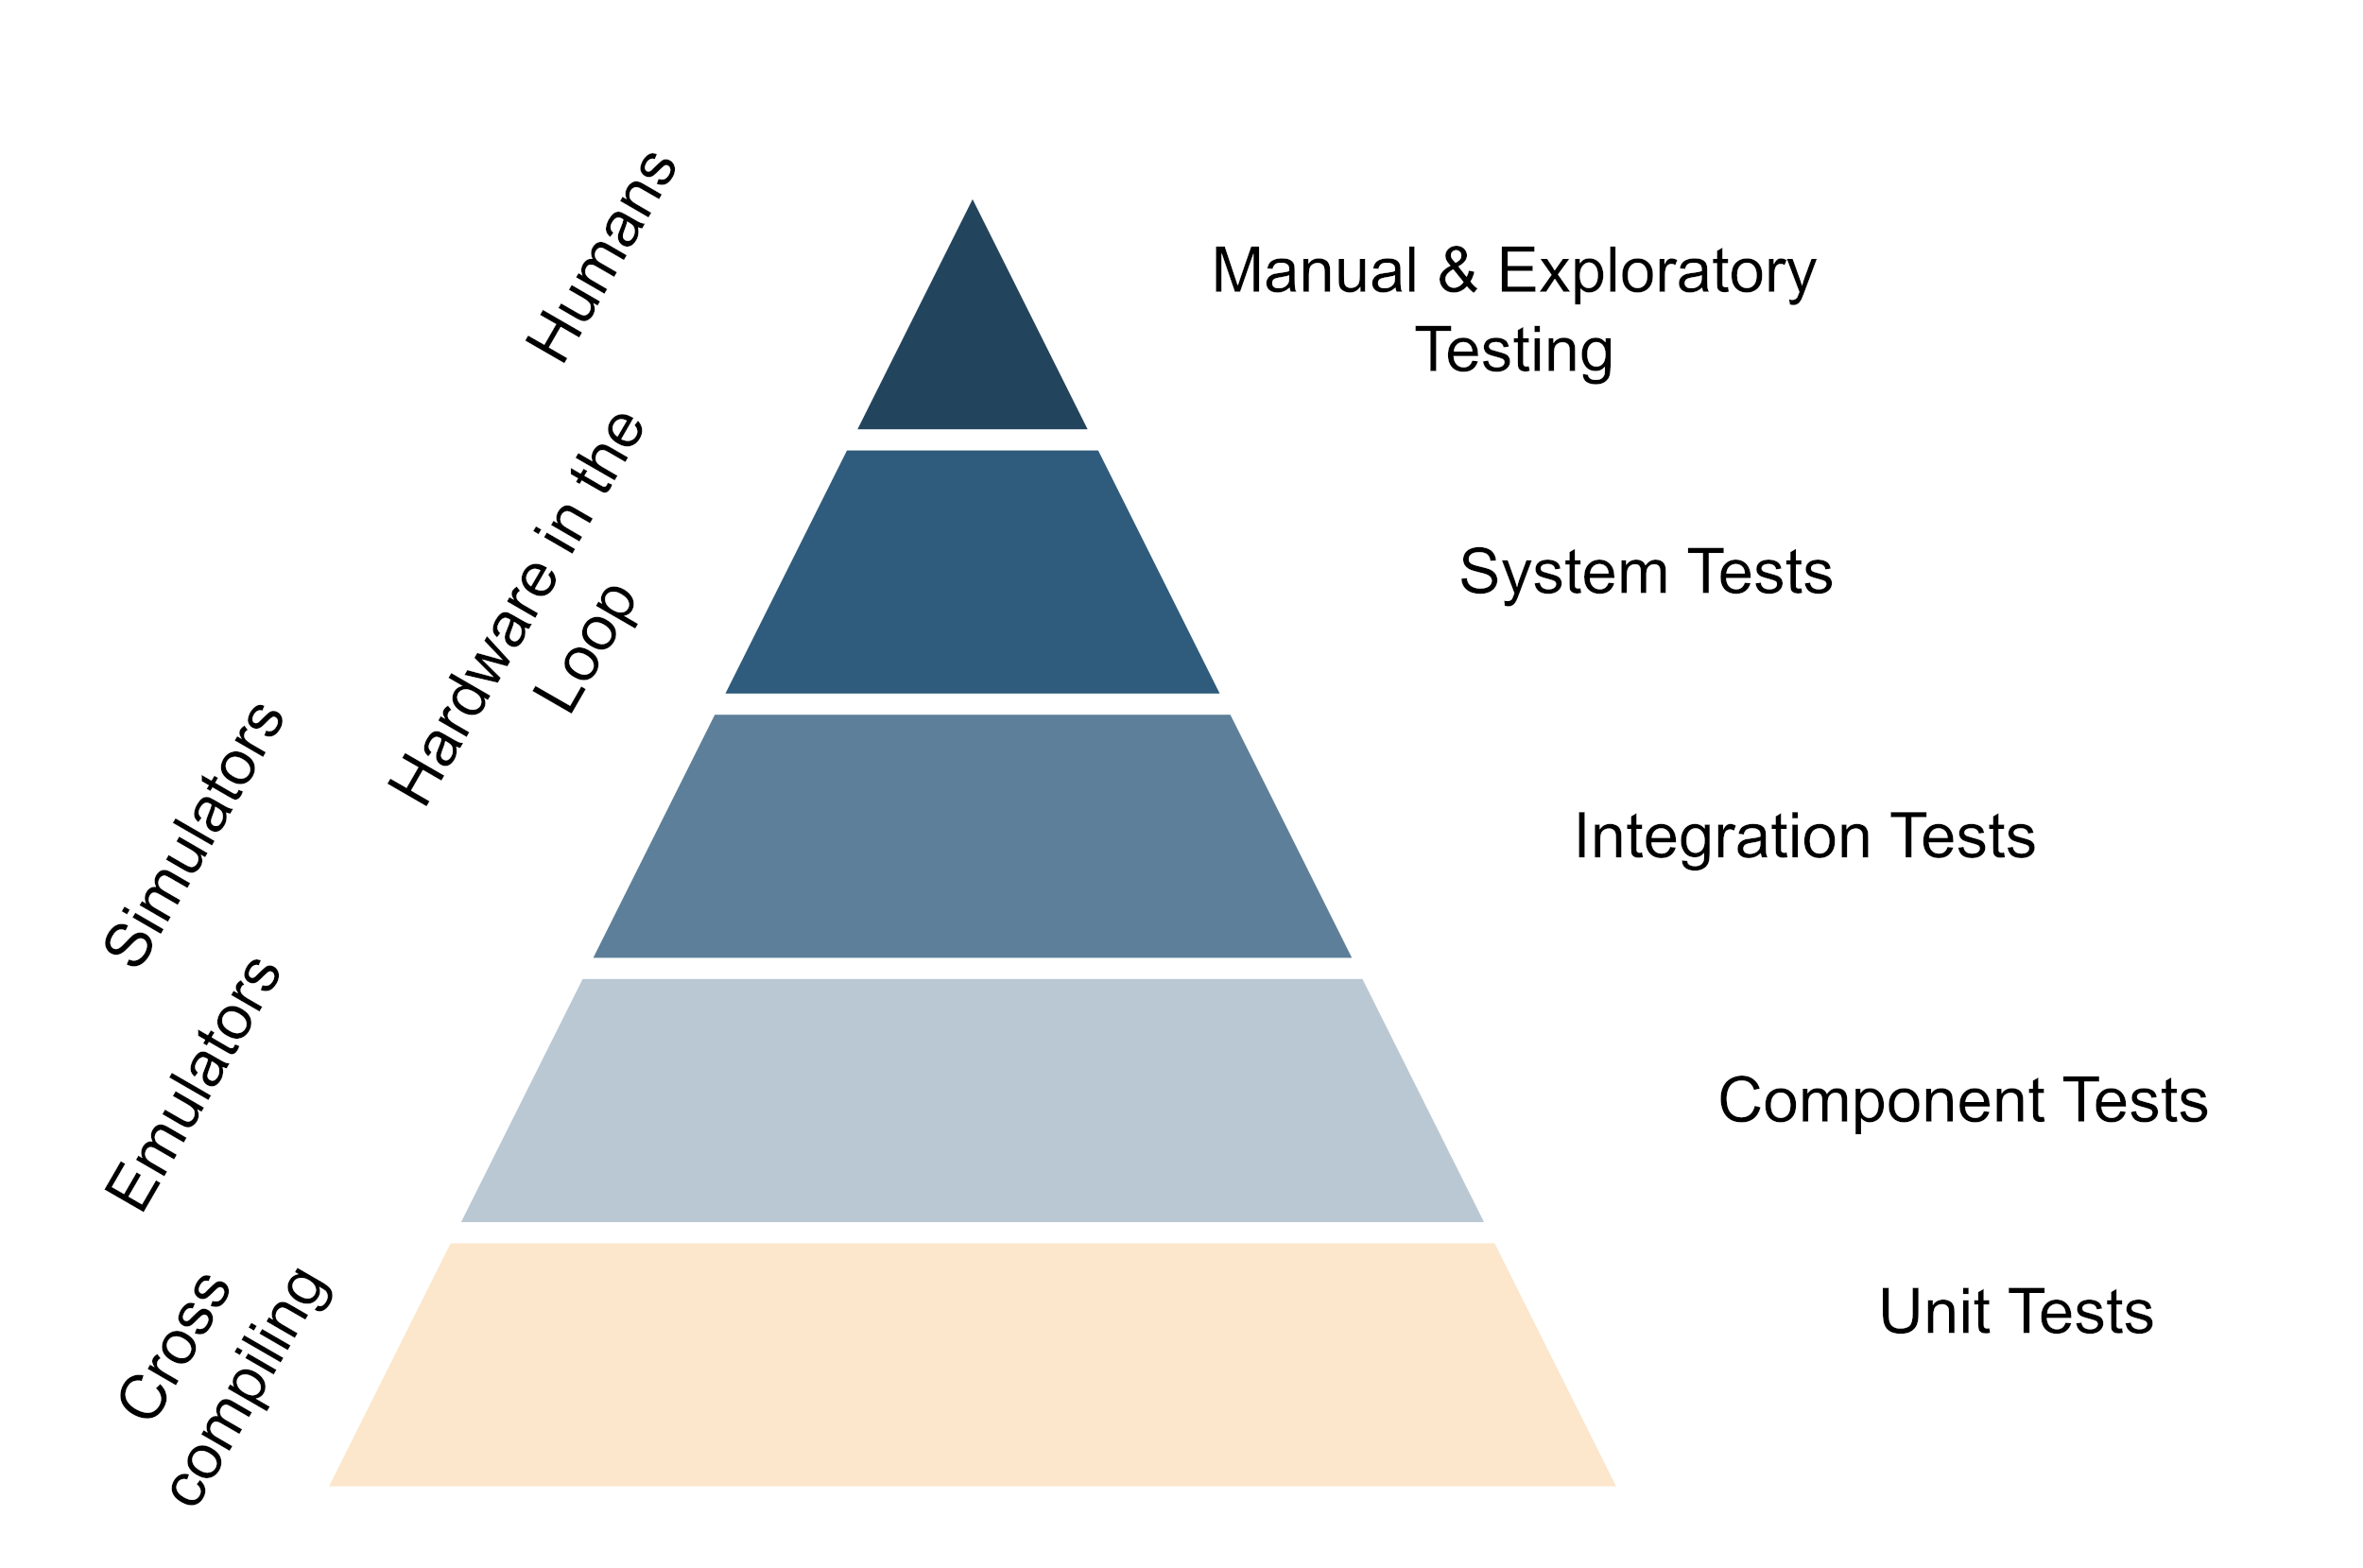
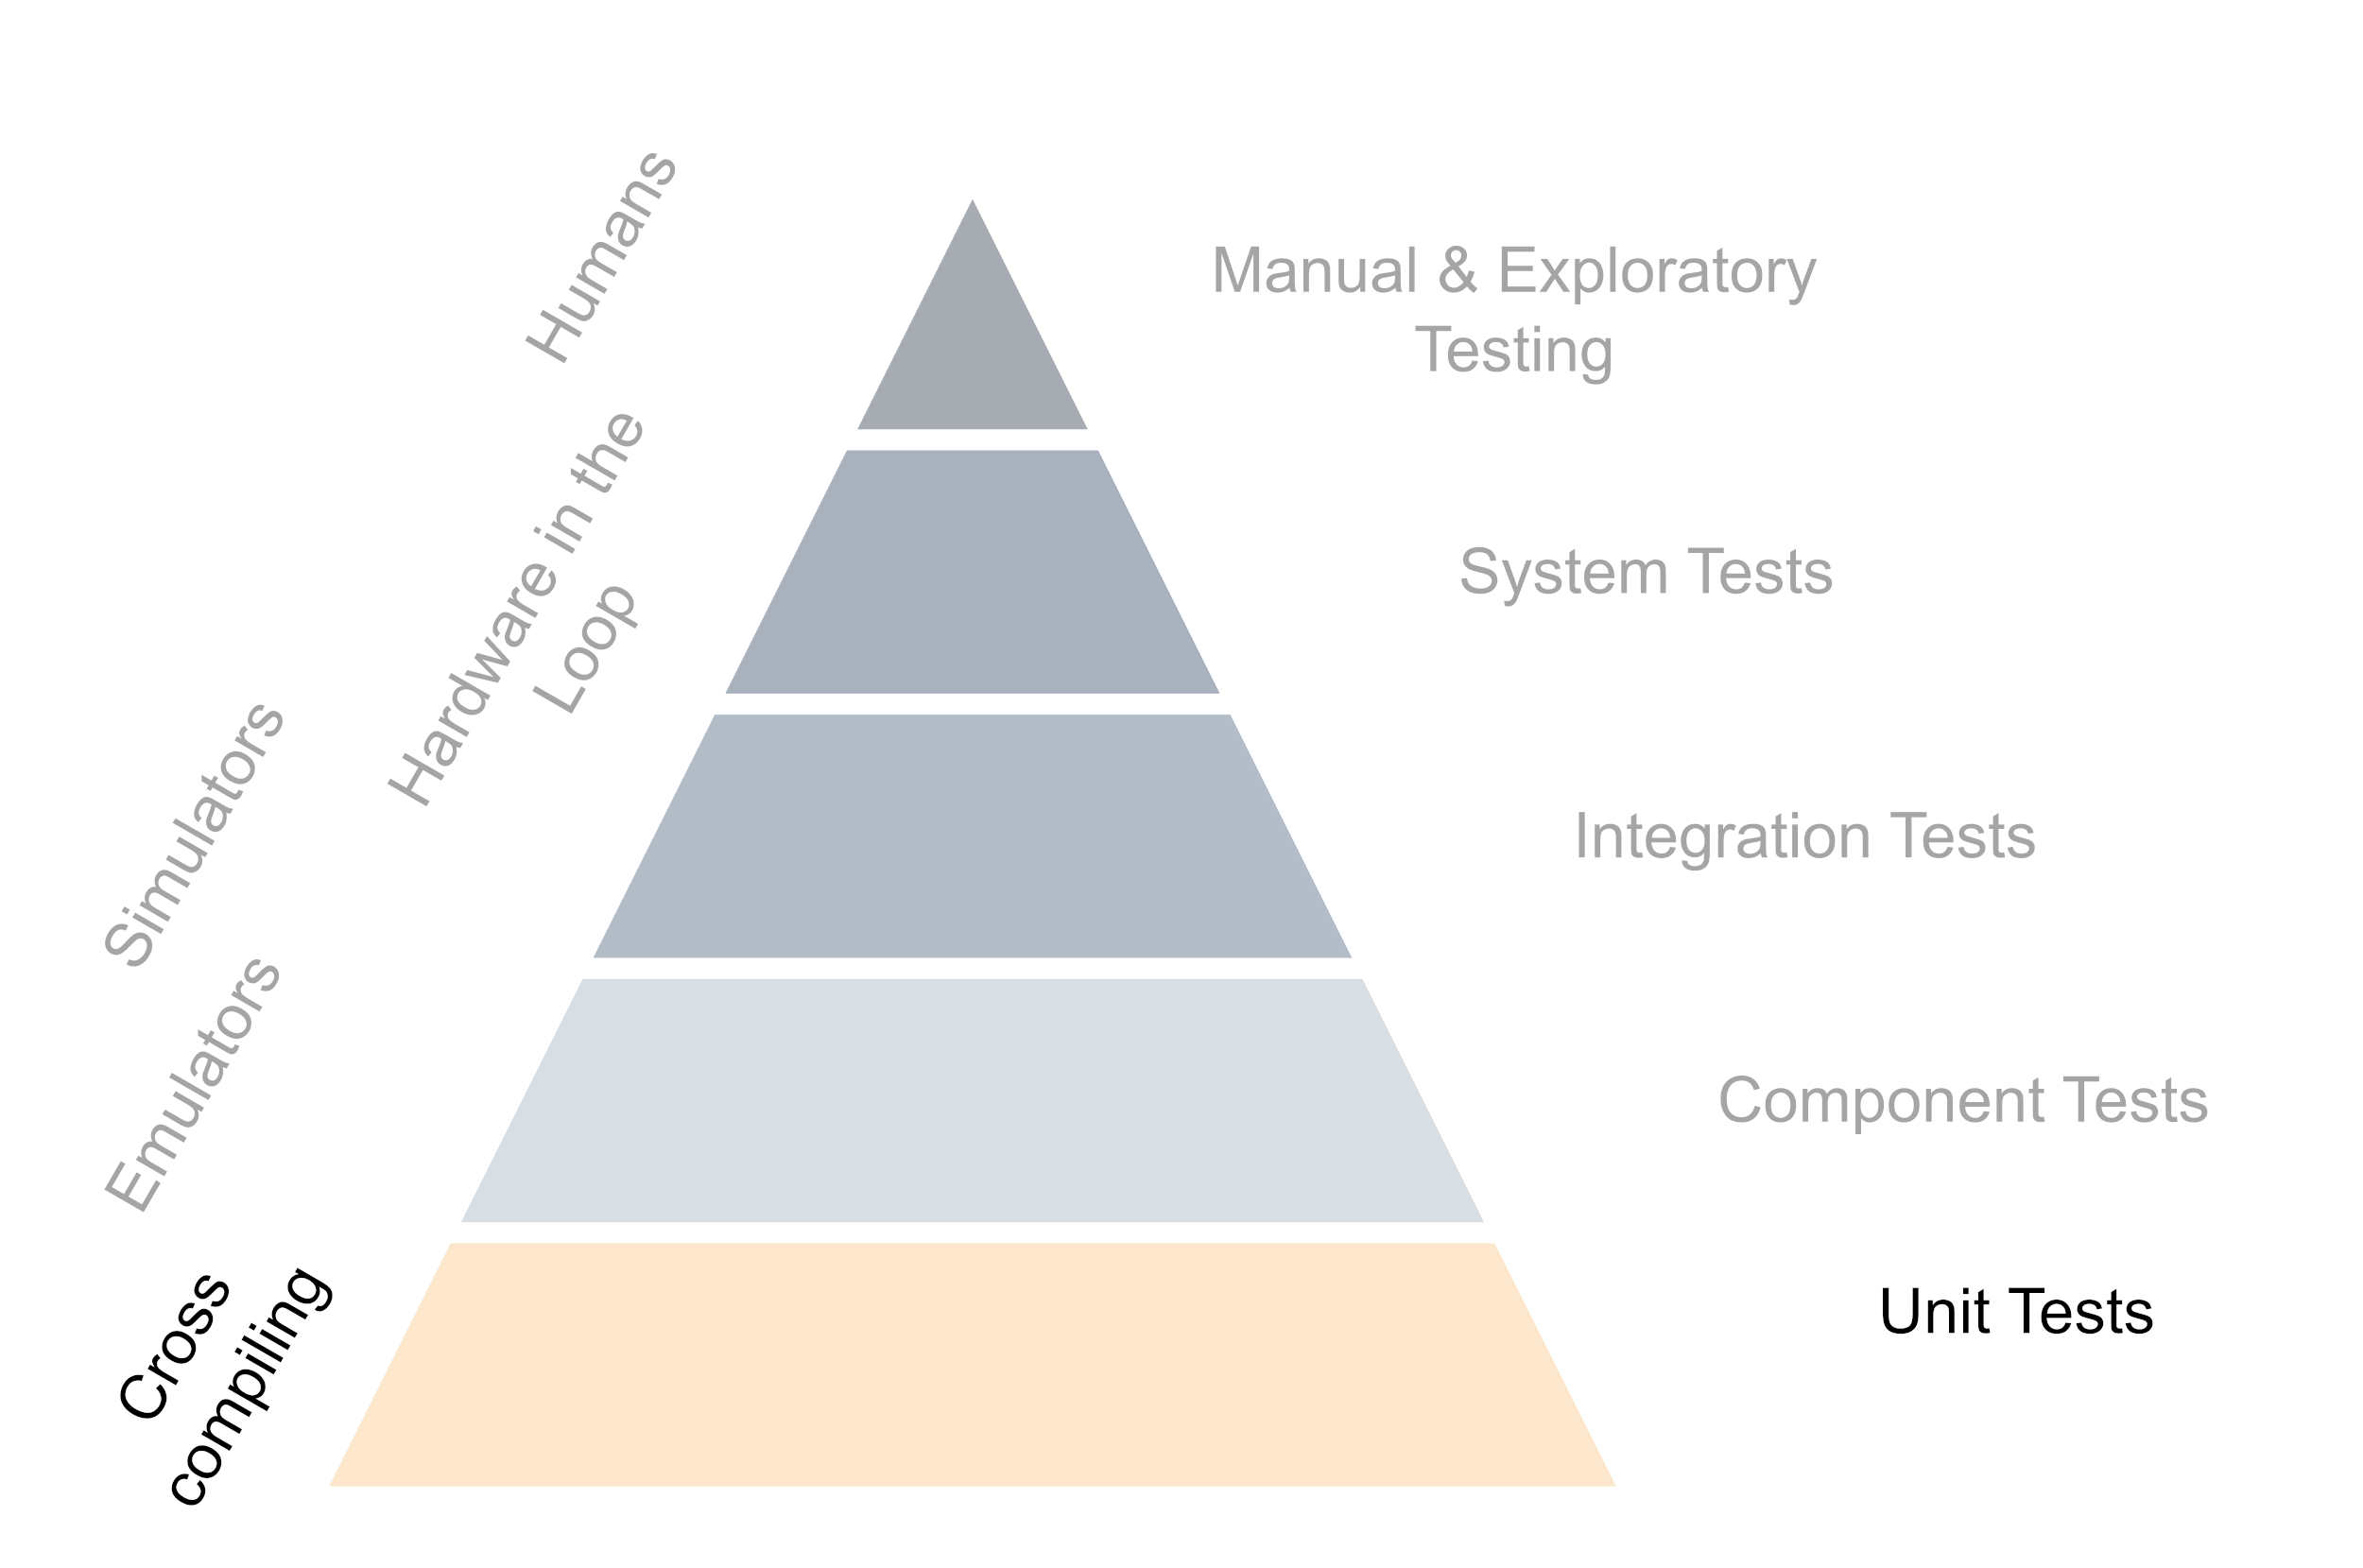
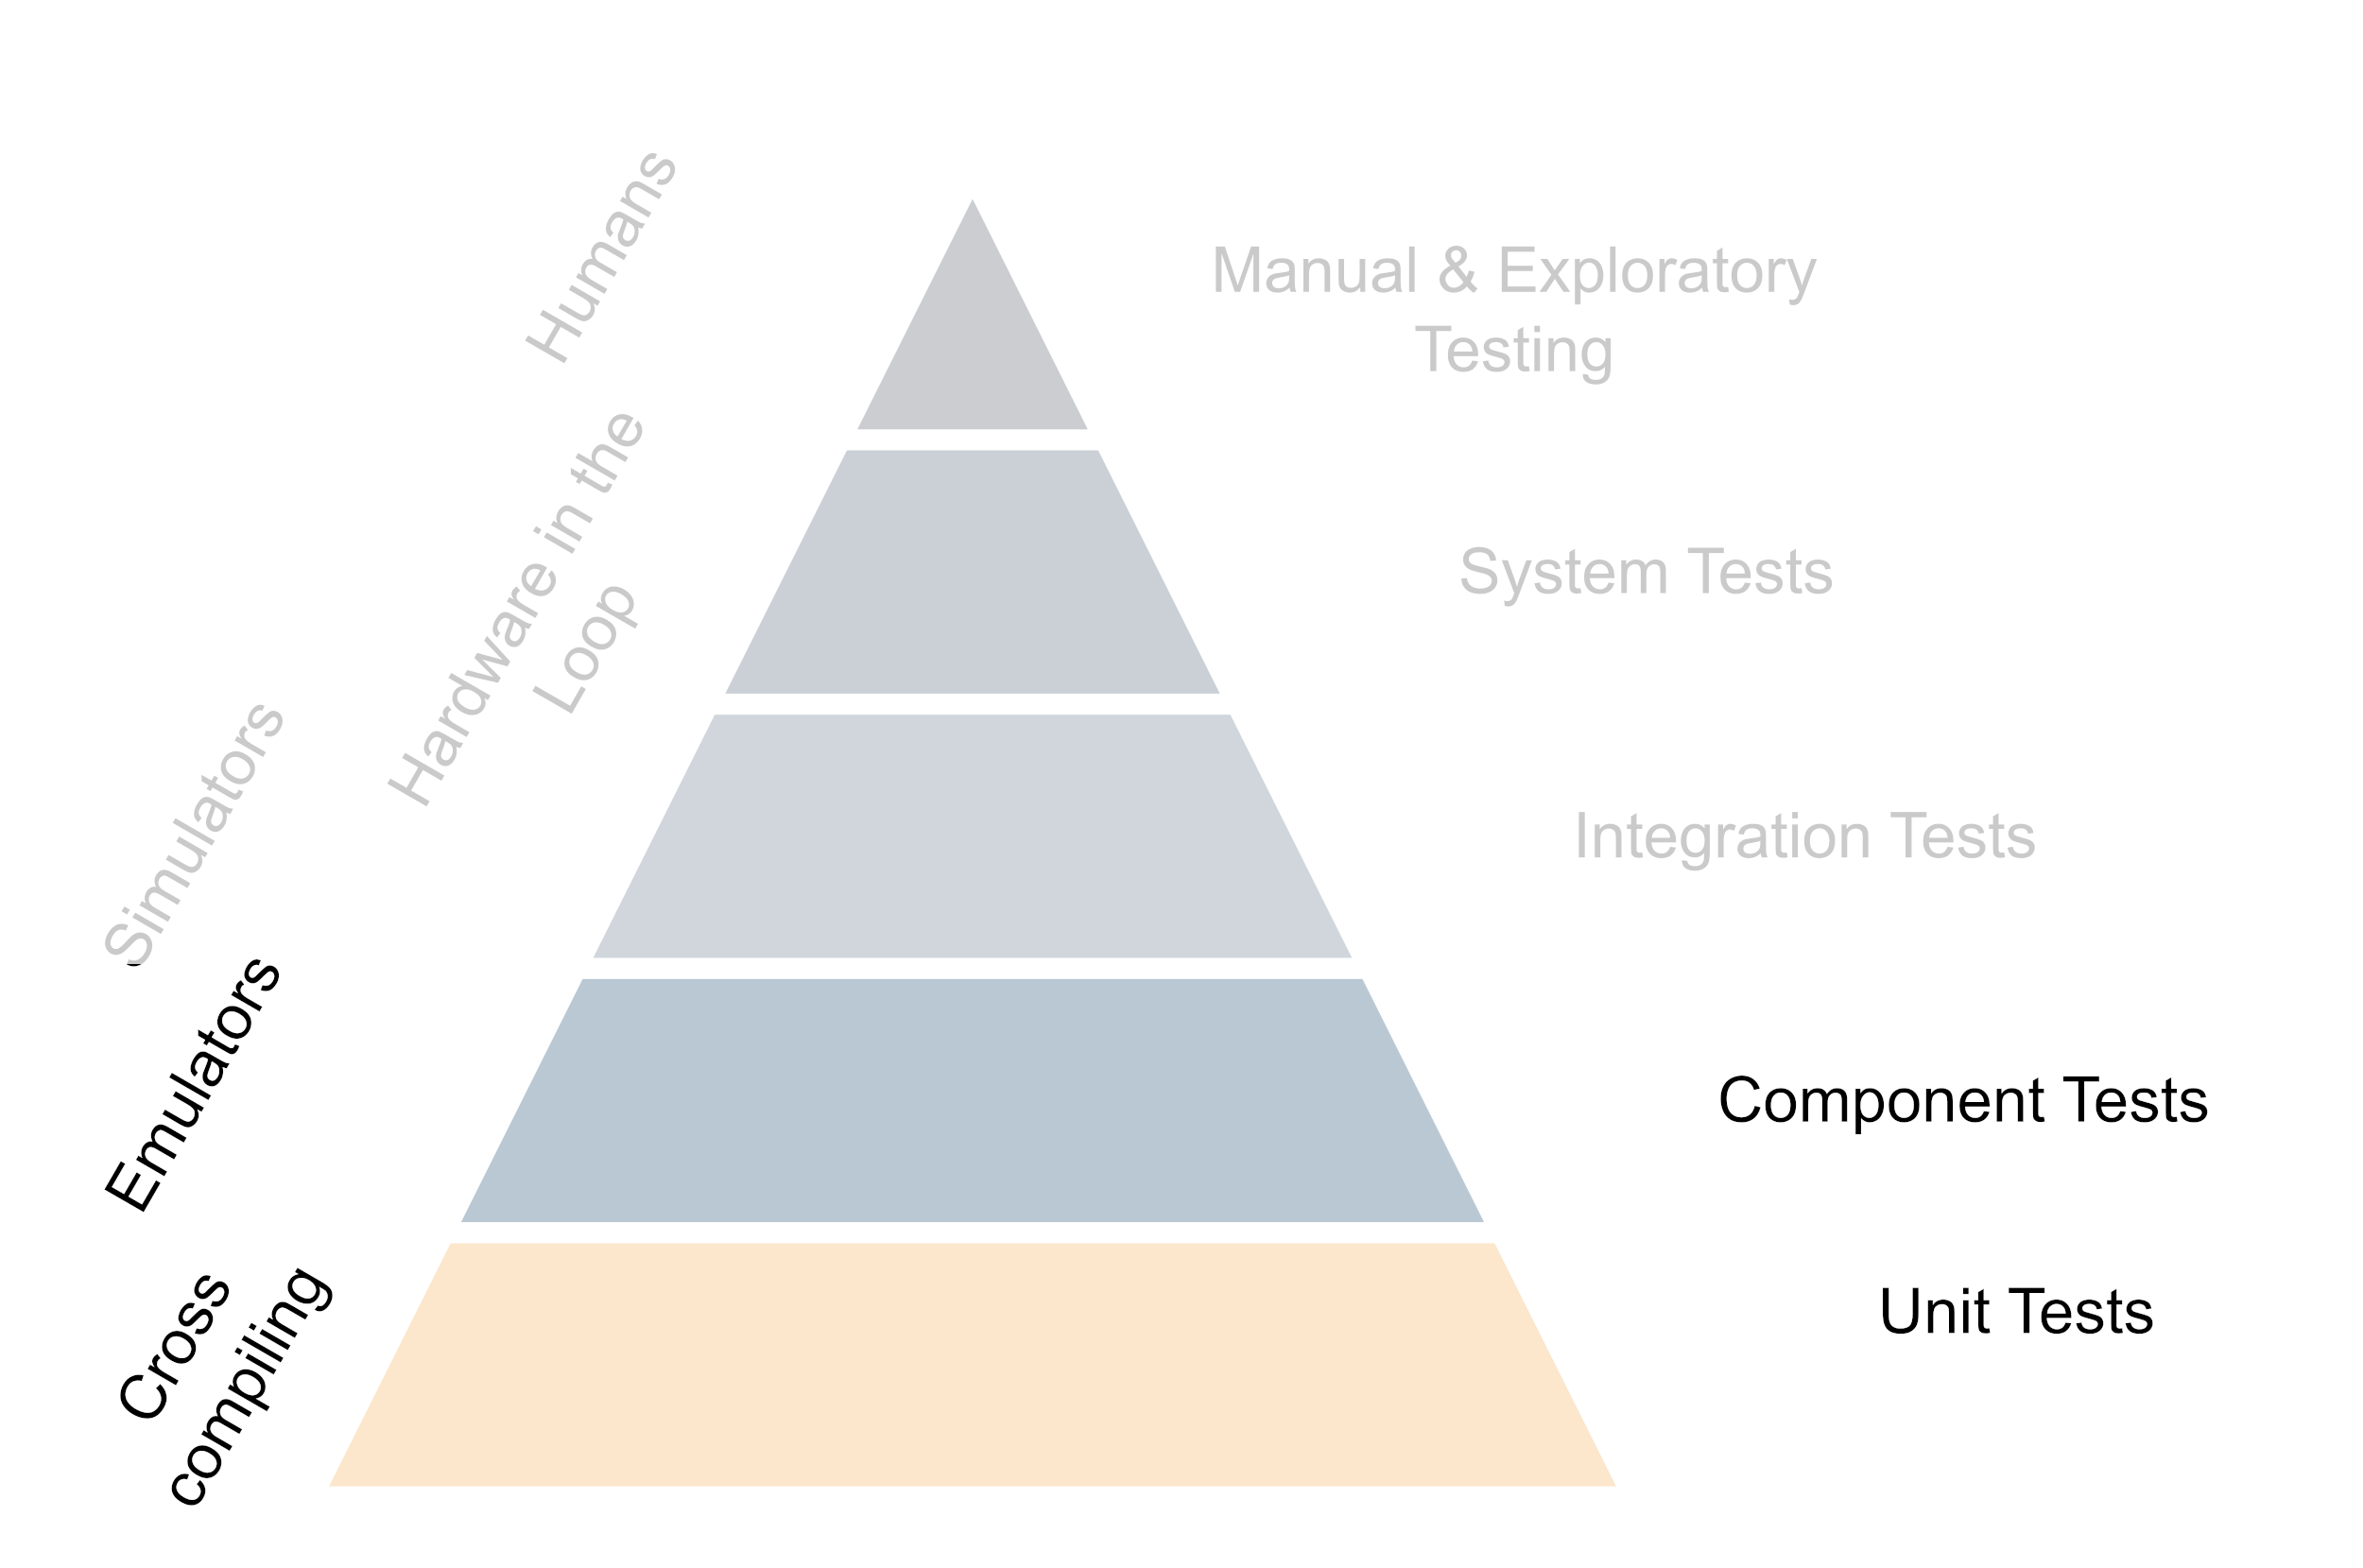
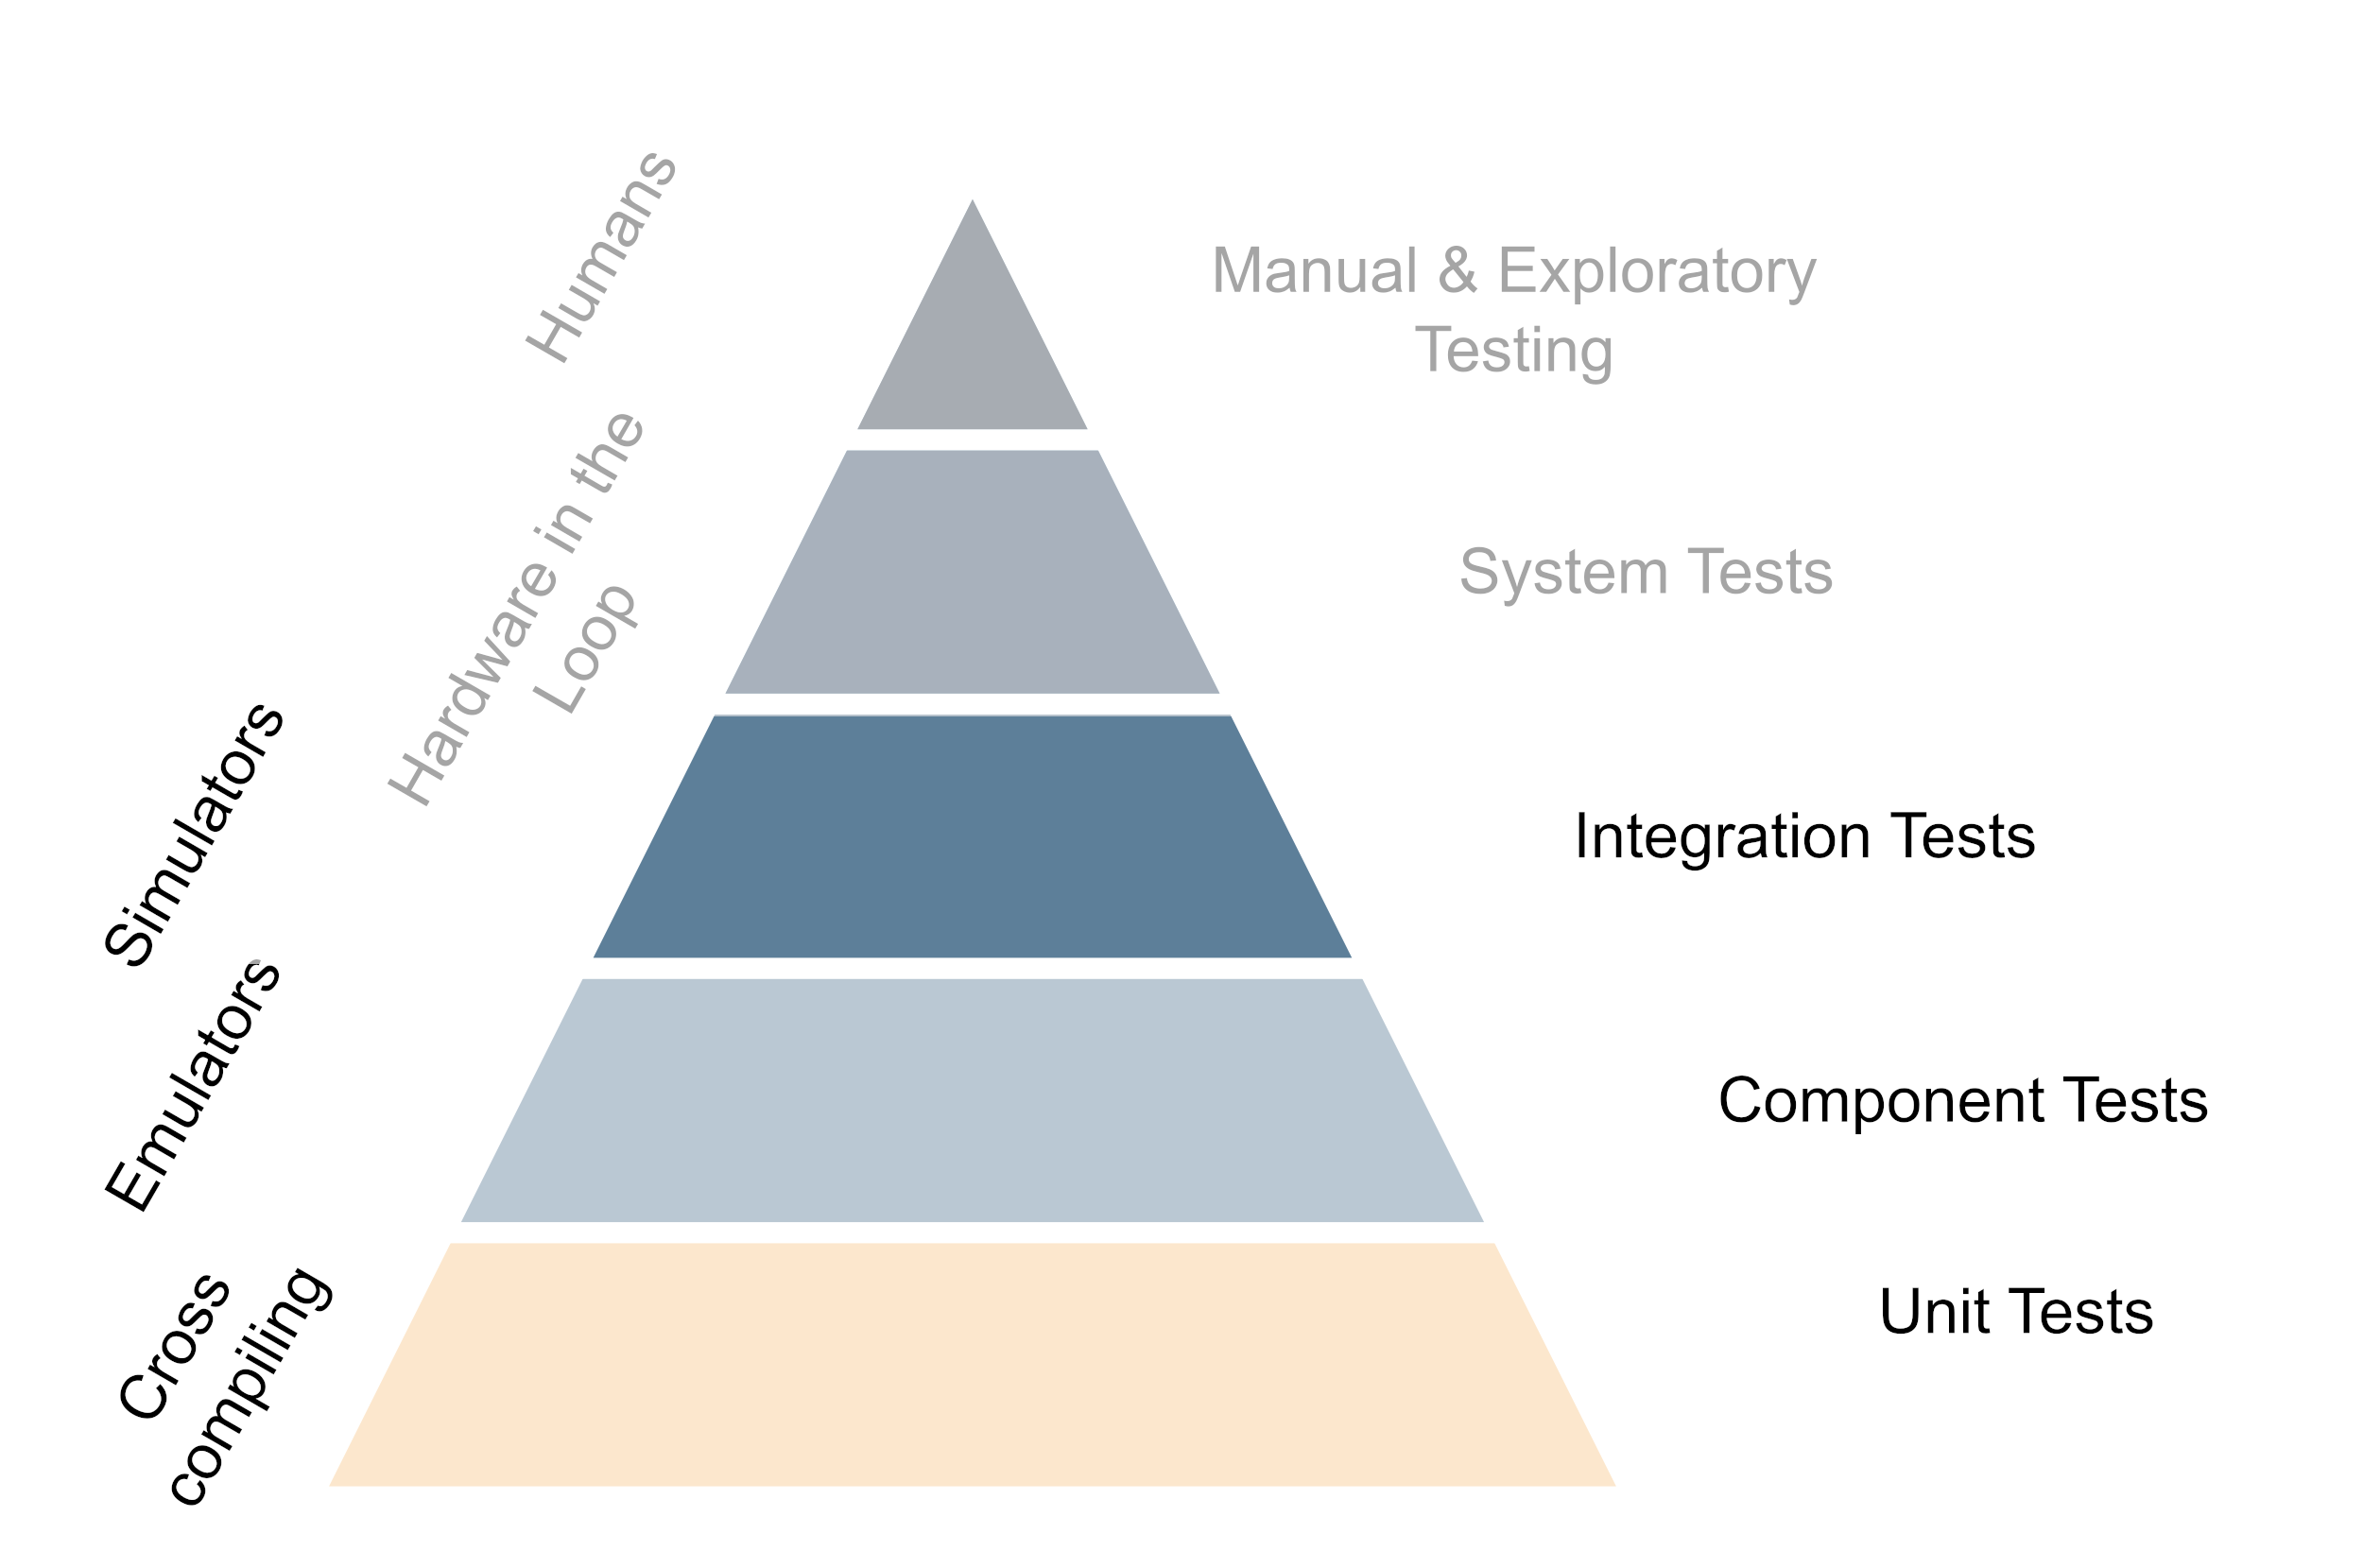
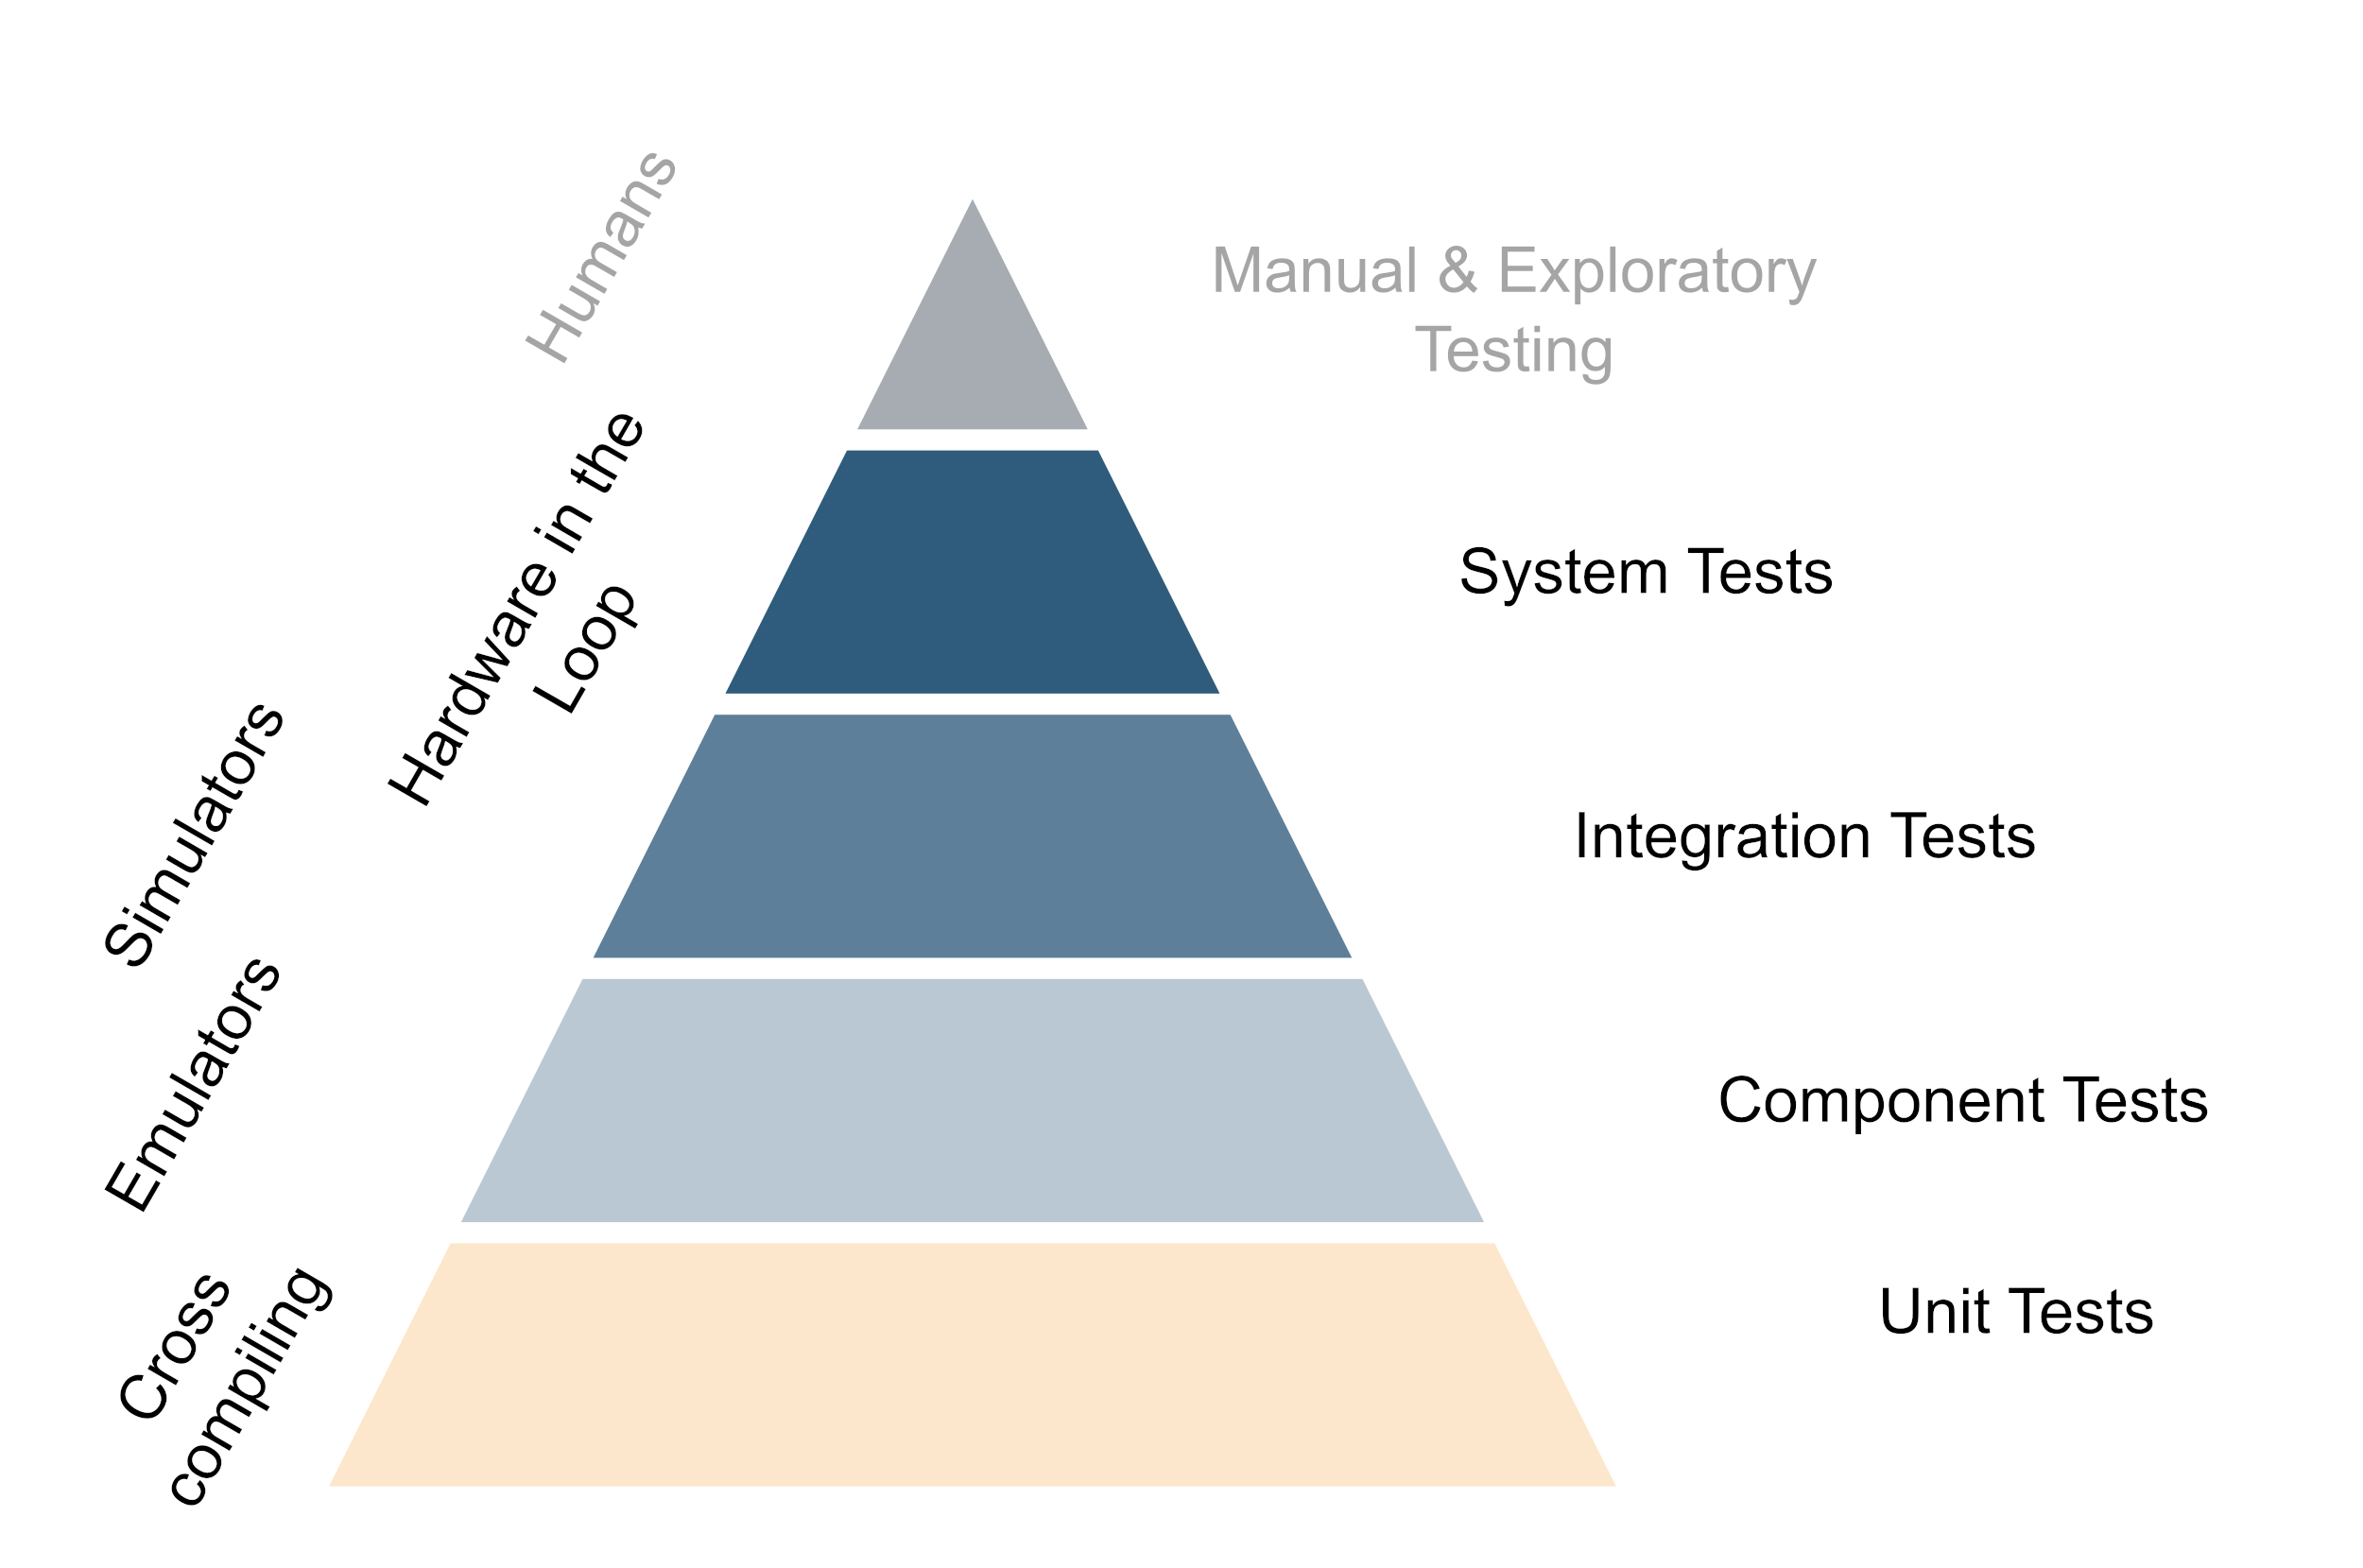
Building a testing strategy on the test pyramid with hardware
The underlying principle of good testing strategies with hardware is to get important feedback from testing as fast as possible while trying to while keeping the maintenance cost of the hardware setup to a minimum. This means that in the day-to-day work, developers should be able to test as much functionality straight out of their editor and only use the real hardware when working on something that is super closely tied to the hardware. For everything that is only slightly relying on the hardware, the tests should preferably be performed by the CI. Of course, developers should have hardware available to run their stuff on and do so once in a while, but not every change should need deployment to the target hardware. This is generally achieved by structuring code in such a way that the hardware-specific code is isolated and can be mocked away easily. Secondly, it is achieved by investing in the build system so the code can be cross-compiled easily to run on the development machine and the actual hardware as well. Also the further up you move on the testing pyramid, the more one benefits from running tests on real hardware - But generally this also means more expensive and time-consuming tests.
The testing pyramid if hardware is involved (Click to enlarge, click again to reduce the size)
All automatic tests should be run on every commit to the main branch of your repo or even on every commit pushed to any branch if the time frame allows that. In reality, this usually means a staged CI pipeline, which runs all unit tests and some of the fast integration tests on every pushed commit, but runs the more expensive ones only when a merge request to the main branch is opened. This way you get fast feedback on the state of your code and you can catch regressions early. And of course, do not forget to regularly run the manual tests on the full set of hardware as well. While all tests should also be run locally by the devs, I usually only run the unit tests concerning the code I’m currently touching unless I have a very specific reason to run the full test suite.
An important thing is that even if the test pyramid shows emulators, simulators etc. the setup should be so, that most of the tests can be run on the actual hardware itself as well and this should also be done regularly to catch hardware-induced regressions. The same applies to the development machines, all emulator- or simulator-based tests should be runnable on the dev’s machine for easy debugging and the devs should have easy access to the hardware for debugging. Let’s look at the different levels of the testing pyramid in more detail. One thing to note is although the levels are shown as discrete steps, in reality, there is often a lot of overlap between them.
The foundation: Cross-Compiling and Unit tests
The base of the test pyramid consists of the smallest and most basic unit tests. Usually, they are also the most numerous and are intended to be run very frequently - so the individual test should be fast. When doing test-driven development (which you should!) these are the workhorses regarding software quality. Because the developers need to be able to run them frequently, the ability to easily cross-compile your code so it can be tested on the developer’s machine and the target hardware is a must. There usually are some unit tests that require some information about the hardware environment, but often the majority of the code can be tested very well by mocking the hardware away.
The base for successful testing with hardware is the ability to cross-compile your code (Click to enlarge, click again to reduce the size)
The lower middle: Emulators and component tests
Component tests are usually a bit more complex than unit tests and they test a larger part of the system but are still pretty localized regarding the code. They are usually still fast enough to run on the developer’s machine and they can be run very frequently on the CI as well. The main difference between unit- and component tests is that component tests are more likely to require some limited system awareness. Emulators like QEMU are a great way to enable low-cost automation and bring some of the behavior of the hardware into play including faking peripherals. Emulators mimic the hardware on a low level but often without the full setup of all running services etc. One downside of the emulators is that they cannot give any indication about the runtime performance of the hardware, for this only the real hardware can be used.
Running tests on emulators shortens the feedback loop as it allows developers to run tests on their machines (Click to enlarge, click again to reduce the size)
The upper middle: Integration testing with simulators
As soon as the components cannot be tested in isolation there is usually also some more surrounding logic needed. This is where integration tests come into play. Integration tests are again more complex than component tests and they test a larger part of the system. They are usually a combination of multiple components but still do not need the full system setup. The way to tackle this is to use simulators on top of the emulators. The main difference between emulation and simulation is that simulators can play back input, and higher-level logic or mimic a changing environment. This means that they can be used to test the interaction between the software and the hardware up to the system boundaries. The distinction between emulation and simulation is not always clear cut and there are often some gray areas. Although not always possible, being able to run the simulator not only on emulation but also on the non-native environment helps generate faster feedback as well. A very useful addition that comes in somewhere at the boundary between simulators and the real hardware is that here we can also test the deployment of the software on the target device, although some might this consider already a system test rather than an integration test.
Simulators are a good way to test with controlled input and complicated workflows (Click to enlarge, click again to reduce the size)
The top: Hardware in the loop
The closer we get to the very complex system tests the more the need for hardware. While the unit-, component- and integration tests should be runnable on the real hardware running the more complex tests yields the most benefit from running on the hardware. It still pays to invest in automation and having system tests running regularly and frequently on your code to avoid some nasty surprises when deploying the software for real. As the availability of the full hardware setup is often a limiting factor and a bottleneck having the hardware in relatively late is a trade-off between the cost of the hardware and the amount of information gained from running on the hardware and the effort of integrating hardware into CI. However, for running the system tests that effort should be taken on to create at least one full set of the system for testing.
When testing the whole system hardware is mandatory (Click to enlarge, click again to reduce the size)
The tip: Involve Humans
Automatic testing is a tremendous cost saver and a very good way to get fast feedback back to the developers. But at some point, nothing beats a human tester. This is also where you want to be as close to the real, completely assembled device as possible. While manual tests might still need faking of some parts of the system, it is a very good way to get a feeling for the system as a whole. Often with manual tests the boundary between testing and quality assurance becomes a bit blurry, especially if the automated tests are solid and already cover a lot of the functionality. Nevertheless, it is often human testers that catch some of the more subtle bugs or point out where things are not optimal. And for that having the whole set up in a close-to-real environment is a huge benefit. Another huge benefit of having such a system around is that it can be shown to customers and stakeholders to get feedback on the usability of the system or to train them in operation.
Complement the automatic tests on the hardware with human interaction. (Click to enlarge, click again to reduce the size)
Balance is key
Investing heavily into testing is a great way to ensure that your software is of high quality but as always there is a balance between effort and gain and there is no catch-all solution for testing strategies regarding hardware. Talking with your team about the testing pyramid and how you want to structure your testing strategy around it is a good starting point. Have a look at the different levels of the pyramid and see where you can get the most bang for your buck. For pure software projects starting to build the pyramid from the base upward is often a good idea. When hardware is involved it can sometimes be beneficial to build the tip first and then start at the bottom, just make sure that the pyramid does not get top-heavy regarding the number of tests. Even if the approach described in this article might not work for your specific situation, I hope that it gives you something to start a conversation about setting up your tests in a meaningful and cost-effective way.
]]>Organizing CMake presets2023-02-19T00:00:00+00:002023-02-19T00:00:00+00:00https://softwarecraft.ch//cmake-presets-best-practicesCMake presets are arguably one of the biggest improvements in CMake since the introduction of targets in 2014. In a nutshell, CMake presets contain information on how to configure, build, test and package a CMake project and they are a tremendous help when managing different configurations for various compilers and platforms. Instead of fiddling with various command-line options, presets are stored in a JSON file and can be used to configure CMake with a single command. This article shows how to set up and organize and use them so they are most effective and easy to maintain.
CMake presets in a nutshell
CMake presets were introduced to CMake with version 3.19, if you are using an older version I strongly recommend updating to a newer version, even if it is just for the sake of being able to use presets. As of early 2023, the built-in support in editors and IDEs for CMake presets is still in its infancy, but there is a noticeable push to accommodate them in most tools.
CMake Best Practices: Discover proven techniques for creating and maintaining programming projects with
CMake. Learn how to use CMake to maximum efficiency with this compendium of best practices for a lot of
common tasks when building C++ software.
As mentioned earlier, CMake presets are a way to store information on how to configure, build, test and package a CMake project. The various presets are stored in JSON files that are named CMakePresets.json or CMakeUserPresets.json and are placed in the root of a CMake project. The former is intended to be checked into version control and the latter is intended to contain system-specific information for each individual user. Various types of presets describe the different steps of building a CMake project:
Configure presets: describe how to configure a CMake project. They specify the generator, toolchain file, CMake cache variables and the build directory among other options.
Build presets: describe how to build a CMake project. They may specify the build targets and the configuration for multi-configuration toolchains such as MSVC or ninja-multi.
Test presets describe the environment and conditions for running tests. They may specify the test executable and the test filter.
Package presets: describe how to package a CMake project. They may specify the package type and the package destination.
Workflow presets: describe a sequence of actions to be executed. They may specify the presets to be executed and the order in which they are executed.
The structure of a CMake preset file is as follows:
The command to configure a project using a preset is cmake --preset <preset-name> and to build with a preset use cmake --build --preset <preset-name>.
Test presets can be invoked over CTest by using ctest --preset <preset-name> or with CMake with cmake --build --preset <preset-name> --target test.
Unfortunately the cpack command line utility so far lacks preset support, so to package with a preset CMake has to be used: cmake --build --preset <preset-name> --target package.
While Test-, Package- and Workflow-presets are useful, in this article I will focus on organizing the configure- and build-presets as they are the most frequently used. For the full documentation on CMake presets see the official CMake documentation.
Organizing CMake presets
As projects grow - especially when they are targetet at multiple platforms - the number of CMake presets can grow quickly. This can make it hard to keep track of them and find the right one. To keep things organized, it is a good idea to get some organization into the presets, so it is easy to find the right preset for the platform and compiler you are using.
I generally recommend having presets for each compiler and platform and combining them by inheriting from them in further presets. This makes it easy to find the right preset and to keep the individual presets small and simple. I tend to use a naming scheme like this: <ci>-<generator>-<toolchain>-<buildType> where the prefix is either ci or dev depending on whether the preset is intended for CI or local development. Generally, all ci presets are located in the CMakePresets.json and are checked in, while dev presets tend at least partially to come from the CMakeUserPresets.json. Where they go is also dependent if it is a public project or not. Presets for public projects should be as generic as possible and not contain any information that is specific to a user or a CI environment, while in a project inside a company the presets might be more specific for a bit of extra convenience.
The generator is the CMake generator, the toolchain is a combination of the platform, compiler and operating system like clang12-armv7-linux and the build type is the build type. For multi-configuration generators like MSVC or ninja-multi, the build type is omitted and configured over build presets.
Example scheme how to organize presets for single configuration compilers (Click to enlarge, click again to reduce the size)
Some example configuration presets that I use frequently in my projects are ci-ninja-x86_64-linux-debug, ci-ninja-x86_64-linux-release, ci-msvc19-x86_64-windows. Note that the MSVC preset does not specify the build type as it is a multi-configuration generator and thus the build type is configured in the build preset.
It is good practice to mark any presets that should not be used to build the project standalone as hidden. This makes it easy to find the presets that are intended to be used. Generally, I recommend marking only presets that have the full definition of generator, toolchain and build type as visible.
Configuration Presets in detail
So what goes into which presets? A typical example for many of my CMake projects contains the following presets.
Standalone presets: These can be aggregated with almost any other combination of presets. They do not define a build directory or a generator. They are all marked hidden and are intended to be used in other presets. Most of them are either defining cache variables or environment variables.
ccache-env (hidden): A preset that defines some environment variables for ccache. This is used in CI and dev builds where ccache is used to speed up the build.
clang-tidy (hidden): A preset that defines the clang-tidy checks to be used. This is used mainly in CI builds where clang-tidy is used to check the code.
iwyu (hidden): A preset that defines the include-what-you-use checks to be used. This is used mainly in CI builds where include-what-you-use is used to check the code.
Generator presets: These presets to define the generator and the build directory. I usually also keep them hidden and use them in other presets.
Ninja: My generator of choice when building for Linux and mac. This preset defines the build directory and the generator.
MSVC: for building on windows
Any other generator required to build on other platforms
Toolchain presets: These contain specific compiler versions and flags. These presets are also marked hidden and are used in other presets. They might also contain library locations such as for Qt or Boost. I often prefix them with either ci if they contain information that is specific to the ci environment or the devcontainer bundled with the project. These might (re-)define the build directory.
gcc-flags: Defines the flags for gcc and clang such as -Wall -Werror
msvc-flags: Defines the flags for MSVC such as /W4 /WX
clang-sanitizer: Defines the flags for clang sanitizer such as -fsanitize=address
msvc-sanitizer: Defines the flags for MSVC sanitizer such as /fsanitize=address
android-ndk: Defines the toolchain file for the android ndk
Qt-5.15.2: Defines the location of the Qt libraries of a specific version
… and more depending on the complexity and size of the project
build-type presets: Defines the build type for single configuration presets. In addition to the default Debug, Release and RelWithDebInfo, I sometimes add coverage build types here. Usually, they define only cache variables or set options. For multi-config generators, I move the relevant information into the build presets.
An example CMakePresets.json to build a Qt project for linux, windows, android and webassembly might look like this (Click to expand).
Note that this particular example does contain some file paths that are specific to the CI setup. To easily replicate build environments I recommend using devcontainers. This particular setup does only contain configure and build presets.
{"version":3,"cmakeMinimumRequired":{"major":3,"minor":21,"patch":0},"configurePresets":[{"name":"ccache-env","hidden":true,"environment":{"CCACHE_BASEDIR":"${sourceDir}","CCACHE_SLOPPINESS":"pch_defines,time_macros"}},{"name":"emscripten","hidden":true,"cacheVariables":{"CMAKE_EXE_LINKER_FLAGS_INIT":"-s WASM=1 -s USE_SDL"},"environment":{"CXX":"/opt/emsdk/emscripten/1.38.30/em++","CC":"/opt/emsdk/emscripten/1.38.30/emcc"},"toolchain:":"emscripten","binaryDir":"${sourceDir}/build_wasm"},{"name":"verbose-debug-output","hidden":true,"cacheVariables":{"EXTENDED_DEBUG_OUTPUT_ENABLED":"ON"}},{"name":"qt-webassembly","hidden":true,"cacheVariables":{"CMAKE_PREFIX_PATH":"/opt/Qt/5.14.1/android_wasm/","CMAKE_FIND_ROOT_PATH_MODE_PACKAGE":"BOTH","CMAKE_FIND_ROOT_PATH_MODE_LIBRARY":"BOTH",},},{"name":"android","hidden":true,"toolchainFile":"/opt/android-ndk/build/cmake/android.toolchain.cmake","cacheVariables":{"ANDROID_ABI":"armeabi-v7a","ANDROID_PLATFORM":"23","ANDROID_SDK":"/opt/android-sdk","CMAKE_FIND_ROOT_PATH_MODE_PACKAGE":"BOTH","CMAKE_FIND_ROOT_PATH_MODE_LIBRARY":"BOTH","CMAKE_FIND_ROOT_PATH_MODE_INCLUDE":"BOTH","OPENSSL_ROOT_DIR":"/opt/android_libs"},"environment":{"JAVA_HOME":"/usr/lib/jvm/java-1.8.0-openjdk-amd64","ANDROID_SDK_ROOT":"/opt/android-sdk","ANDROID_NDK_ROOT":"/opt/android-sdk"},"binaryDir":"${sourceDir}/build_android"},{"name":"Qt-desktop","hidden":true,"cacheVariables":{"CMAKE_PREFIX_PATH":"/opt/Qt/5.14.1/gcc_64/"},"binaryDir":"${sourceDir}/build"},{"name":"Qt-android","hidden":true,"cacheVariables":{"CMAKE_PREFIX_PATH":"/opt/Qt/5.14.1/android/"}},{"name":"ci-ninja","displayName":"Ninja","description":"build using Ninja generator","inherits":["ccache-env"],"generator":"Ninja","hidden":true},{"name":"ci-ninja-debug","displayName":"Ninja Debug","inherits":["Qt-desktop","ci-ninja","verbose-debug-output"],"cacheVariables":{"CMAKE_BUILD_TYPE":"Debug"}},{"name":"ci-ninja-wasm-debug","displayName":"Ninja Webassembly Debug","inherits":["ci-ninja","qt-webassembly","emscripten"],"cacheVariables":{"CMAKE_BUILD_TYPE":"Debug"}},{"name":"ci-ninja-debug-unittest","displayName":"Ninja Debug for Unit Tests","inherits":["Qt-desktop","ci-ninja","verbose-debug-output"],"cacheVariables":{"CMAKE_BUILD_TYPE":"Debug"}},{"name":"ci-ninja-release","displayName":"Ninja Release","inherits":["Qt-desktop","ci-ninja"],"cacheVariables":{"CMAKE_BUILD_TYPE":"Release"}},{"name":"ci-ninja-android-debug","displayName":"Ninja Android Debug","inherits":["Qt-android","ci-ninja","android","verbose-debug-output"],"cacheVariables":{"CMAKE_BUILD_TYPE":"Debug"}},{"name":"ci-windows-msvc2017","displayName":"MSVC 2017","generator":"Visual Studio 15 2017","binaryDir":"${sourceDir}/build","condition":{"type":"equals","lhs":"${hostSystemName}","rhs":"Windows"}},],"buildPresets":[{"name":"ci-msvc2017-debug","displayName":"MSVC 2017 Debug","configurePreset":"ci-windows-msvc2017","configuration":"Debug","condition":{"type":"equals","lhs":"${hostSystemName}","rhs":"Windows"}},{"name":"ci-msvc2017-release","displayName":"MSVC 2017 release","configurePreset":"ci-windows-msvc2017","configuration":"Release","condition":{"type":"equals","lhs":"${hostSystemName}","rhs":"Windows"}}],}
Overall this setup usually gives me a very good mix of being open enough to be used in different environments and specific enough to be conveniently useful. The downside is that this can lead to a lot of presets to manage, so it might be helpful to split these up into multiple files and use includes to manage them.
Presets in real life
in my opinion CMake presets are one of the most powerful features of CMake and a great addition to the tool. Especially if you’re working with an editor or IDE that supports them natively it reduces the complexity of using CMake drastically as I no longer have to memorize the specific options and flags for each project. Presets are also a great way to keep the CMakeLists.txt clean and agnostic the build environment. By having the presets the temptation to put specific compiler flags or other environment-specific information into the CMakeLists.txt is greatly reduced - which is a very good thing when it comes to maintainability. The downside is of course that the complexity handling of multi-platform projects is not reduced but just shifted to a different file and that one now has to manage not just the CMakeLists.txt but also the preset files.
Overall I think that the benefits of using CMake presets outweigh the downsides and I would recommend using them in every project - whether you follow my strategy for organizing them or find your own way to do it.
]]>CMake line by line - Building and Android APK with Qt52022-11-24T00:00:00+00:002022-11-24T00:00:00+00:00https://softwarecraft.ch//cmake-android-apk-and-qtIf you build GUI applications with C++ and Qt, chances are that you have to create a mobile version of it. While the discussion, if Qt and C++ or the native Android SDK is the right technology to use is certainly worth a tought, there are situations where it makes sense to stick with Qt and C++. This article illustrates line by line how to build a C++/Qt application for android with CMake and how to pack it into an android APK.
This post will walk through the CMakeLists.txt file to build a Qt application for desktop and android and then pack it into an APK.
The example project used in this article can be found on GitHub.
Since the dependencies for building an Android APK with CMake are quite heavy, I recommend using development containers to set up your development environment. This way you can use the same environment on your local machine and your CI server.
CMake Best Practices: Discover proven techniques for creating and maintaining programming projects with
CMake. Learn how to use CMake to maximum efficiency with this compendium of best practices for a lot of
common tasks when building C++ software.
In a nutshell, running a C++/Qt Application on Android works by wrapping the C++ application in Java code. The Java code, all dependencies and resources are then packed into an Android APK. Under the hood, the C++ code is compiled into a shared library that is then loaded by the Java code at runtime. The C++ code is compiled and linked against the libraries from the Android Native Development Kit (NDK), while the Java code is built on the Android SDK. Conveniently the NDK provides a toolchain file for CMake to configure the C++ compiler and set the sysroot.
Qt for android contains a template for the AndroidManifest.xml the Qt directory under src/android/templates which can be copied to the source folder.
The example builds a small slideshow application that rotates through a set of images. All the code for this example can be found on GitHub/bernedom/CMakeQtAPK.
The sample QML application running in the android emulator (Click to enlarge, click again to reduce the size)
The src folder contains all C++ sources and Qml files and resources to build the app. The android folder contains the android-specific files, in our case only the AndroidManifest.xml file. The CMakeLists.txt file contains the build instructions for the project. The CMakePresets.json file contains the build configurations for the project.
So let’s look at the CMake code to build an APK.
Building an APK with CMake
Finding and configuring CMake to use Android and Qt
To build for Android, CMake needs to know the location of a java compiler, the Android NDK and SDK as well as the Qt location. Additionally, the Android target platform and ABI have to be specified. I prefer to pass configuration options to CMake by using CMake presets, which are available from CMake 3.19. Alternatively, the options can be passed to CMake via the command line or by setting environment variables. Avoid hard coding the values in the CMakeLists.txt as it makes it harder to build the project on different machines.
The CMake presets are defined in the CMakePresets.json file. The presets are defined in a JSON file and can be used to configure CMake:
The name field is used to identify the preset and the toolchainFile field points to the toolchain file provided by the Android NDK. This toolchain file tells CMake to use the clang compiler from the NDK to cross-compile and changes the search paths to the libraries to the sysroot included with the NDK.
The cacheVariables field is used to pass configuration options to CMake. In this case, we set the ABI to armeabi-v7a, the target platform to Android 6.0 (API level 23) and the location of the Android SDK.
Additionally, we set the CMAKE_FIND_ROOT_PATH_MODE_PACKAGE to BOTH to make sure that CMake searches for packages in the sysroot and in the host system. This is needed to find the Qt libraries which are outside the sysroot. The ANDROID_BUILD_ABI_armeabi-v7a variable is used to enable building for the armv7 ABI in the toolchain file.
The environment field is used to set environment variables that are used by the toolchain file. the JAVA_HOME variable is used to find the java compiler, the ANDROID_SDK_ROOT and ANDROID_NDK_ROOT variables are used to find the Android SDK and NDK and the CMAKE_PREFIX_PATH variable is used to find the Qt libraries.
The binaryDir field is used to set the build directory for the preset. The ${sourceDir} variable is a CMake variable that is replaced by the path to the source directory.
With the environment set up, let’s have a look at the CMakeLists.txt
cmake_minimum_required(VERSION 3.21)project(
CMakeQtAPKExample
VERSION 1.0
DESCRIPTION
"An example repository to showcase how to build a simple C++ android app with Qt/QML and CMake"
LANGUAGES CXX)find_package(Qt5 REQUIRED COMPONENTS Core Quick)set(ANDROID_PACKAGE_SOURCE_DIR "${CMAKE_CURRENT_SOURCE_DIR}/android" CACHE INTERNAL "" FORCE)set(CMAKE_AUTOMOC ON)set(CMAKE_AUTORCC ON)if(NOT ANDROID)add_executable(QMLDesktopExample)elseif(ANDROID)add_library(QMLDesktopExample SHARED)find_package(Qt5 REQUIRED AndroidExtras)target_link_libraries(QMLDesktopExample PRIVATE Qt5::AndroidExtras)set_target_properties(QMLDesktopExample PROPERTIES LIBRARY_OUTPUT_NAME ${PROJECT_NAME})add_dependencies(apk QMLDesktopExample)endif()target_sources(QMLDesktopExample PRIVATE src/main.cpp src/slideshow.cpp src/qml/qml.qrc)target_link_libraries(QMLDesktopExample PRIVATE Qt5::Core Qt5::Quick)
The first line cmake_minimum_required(VERSION 3.21) sets the minimum required CMake version to 3.21. since this project is using CMake presets, this is the minimum required version.
The call to project() sets up the basic project information. In this case, the project is called CMakeQtAPKExample and we tell CMake that it is a C++ project by setting the LANGUAGES to CXX. Qt will later use the project name for the generated APK.
Before we start defining our application, tell CMake to look for the necessary Qt libraries with the call to find_package(Qt5 REQUIRED COMPONENTS Core Quick). This tells CMake to look for the package Qt5 which is required for building this project, and inside the package the modules Core and Quick should be present. If any of the modules or the package itself is not found, CMake will stop with an error. Since Qt for android is usually not installed in the default location, we added the path to Qt to the CMAKE_PREFIX_PATH variable in the CMakePresets.json.
Next, we tell CMake where to find the Android-specific files by setting the ANDROID_PACKAGE_SOURCE_DIR variable to the android subfolder. Since this is a very simple project the directory only contains the AndroidManifest.xml but for more complex projects build.gradle and other gradle scripts, as well as custom java code, can be placed there. You’ll notice that this variable is set as an internal cache variable that will be force-overwritten by each configuration step. This is needed so the Qt AndroidExtras module is forced to use our custom AndroidManifest.xml file instead of the generated one. This is a somewhat hacky solution caused by the Qt Android extras from Qt5 not respecting the variable otherwise.
The next two lines set(CMAKE_AUTOMOC ON) and set(CMAKE_AUTORCC ON) tell CMake to automatically generate the moc-files and compile any qrc files attached to any CMake target.
A typical use case is that the same code is used for desktop and mobile. In this case, we can use the if-statement to check if we are building for Android or not. If we are building for a desktop, a regular executable is created by defining the target with add_executable.
If we are building for Android, we create a target that creates a shared library with add_library(QMLDesktopExample SHARED). The library has to be shared, so it can be dynamically loaded by the generated java code on android. This is different from regular library projects, where we would let the developer choose if a library target should be built as a static or dynamic lib.
Next, we search the AndroidExtras module from Qt with another find_package call. The AndroidExtras will do most of the android specific stuff in CMake. It will generate a android_deployment_settings.json file used to pack the application which will be placed in the build directory. The AndroidExtras will also generate a target called apk which can later be used for packaging the application for deployment to android. Additionally, there will be other similar targets such as the aab for building android app bundles. Unfortunately the [documentation for the AndroidExtras module is very slim, so you will have to look at the source code if you want to find out more.
The target_link_libraries call links the Qt5::AndroidExtras module to our application target which will add any dependencies needed to run the code on android.
Since the AndroidExtras will automatically name the APK the same as the project name and expects the library to be named the same, we set the LIBRARY_OUTPUT_NAME to the variable ${PROJECT_NAME} which contains the name of the project (CMakeAPKExample). Note that we only change the name of the output file and not the name of the target itself.
Finally, a dependency on the apk target is added to the QMLDesktopExample target with the call to add_dependencies(apk QMLDesktopExample). This will ensure that when the apk target is built, then our library target will also be built. The apk target is provided by the Qt AndroidExtras. And that is all that is needed regarding the Android-specific CMake code.
So now the target is set up, we only need to add the C++ sources and Qml resources to it. This happens in the next line target_sources(QMLDesktopExample PRIVATE src/main.cpp src/slideshow.cpp src/qml/qml.qrc). The PRIVATE keyword tells CMake that the files are only used by the target itself and not by any other target. And lastly, the target_link_libraries call links the Qt5::Core and Qt5::Quick` modules to our application target which will add any dependencies needed to run the code.
Building the APK
Now that we have the CMake code ready, we can build the APK. To configure and build the example project, we can use the cmake command line tool and the preset we defined like this:
This will first configure the project and then build the APK. The APK will be located in the build_android folder as defined in our preset.
Since Qt itself and the Android NDK and SDK are quite heavy dependencies I recommend using containerized build environments](https://softwarecraft.ch/using-devcontainers-with-cpp/) to build the project. This will ensure that the build-environment is always the same and that your OS is not polluted with the dependencies. This comes in especially handy as it is often the case that one needs to build for different android versions and installing everything directly into the OS can be a hassle.
Running the APK
The APK can now be run on any supported android device by either copying the APK to the device or android emulator or by using the adb tool. To install it with the adb tool USB debugging has to be enabled on the android device, we can use the following command:
adb usb
adb install-r <Path_To_APK>
Conclusion
While it needs a bit of effort to set up, building and running simple Qt applications on Android is not that hard thanks to the Qt AndroidExtras module that does most of the work. There is more to releasing software on Android, such as publishing on the play store and signing the generated APK as well as publishing for the various android versions out there. However, this post should give you a good starting point to get started with Qt on Android and hopefully, you will be able to build your own Qt applications for Android. Have fun running stuff on Android!
While Qt6 is out and provides some additional features to build for android, Qt5 is still widely used, so this example focuses on Qt5 but the technique should also apply to Qt6. ↩